Difference between revisions of "Leave request management Module"
| (9 intermediate revisions by 2 users not shown) | |||
| Line 5: | Line 5: | ||
There is no need of installing this module, as it is already included within Tactic services. | There is no need of installing this module, as it is already included within Tactic services. | ||
= Setup = | = Setup = | ||
For using this module the users need to enable it by using an administrator account. The menu options for activating this module are: '''Home –> Setup – > Module'''. The users then need to click on '''Activate'''. The modules will be activated after completing this step. The settings icon {{#fas:cog}} will be visible at the end of the module box, the users can click in that to access setup. | For using this module the users need to enable it by using an administrator account. The menu options for activating this module are: '''Home –> Setup – > Module'''. The users then need to click on '''Activate'''. The modules will be activated after completing this step. The settings icon {{#fas:cog}} will be visible at the end of the module box, the users can click in that to access further setup for this module to access the functionalities in a better way. | ||
= Creation of a leave = | = Creation of a leave = | ||
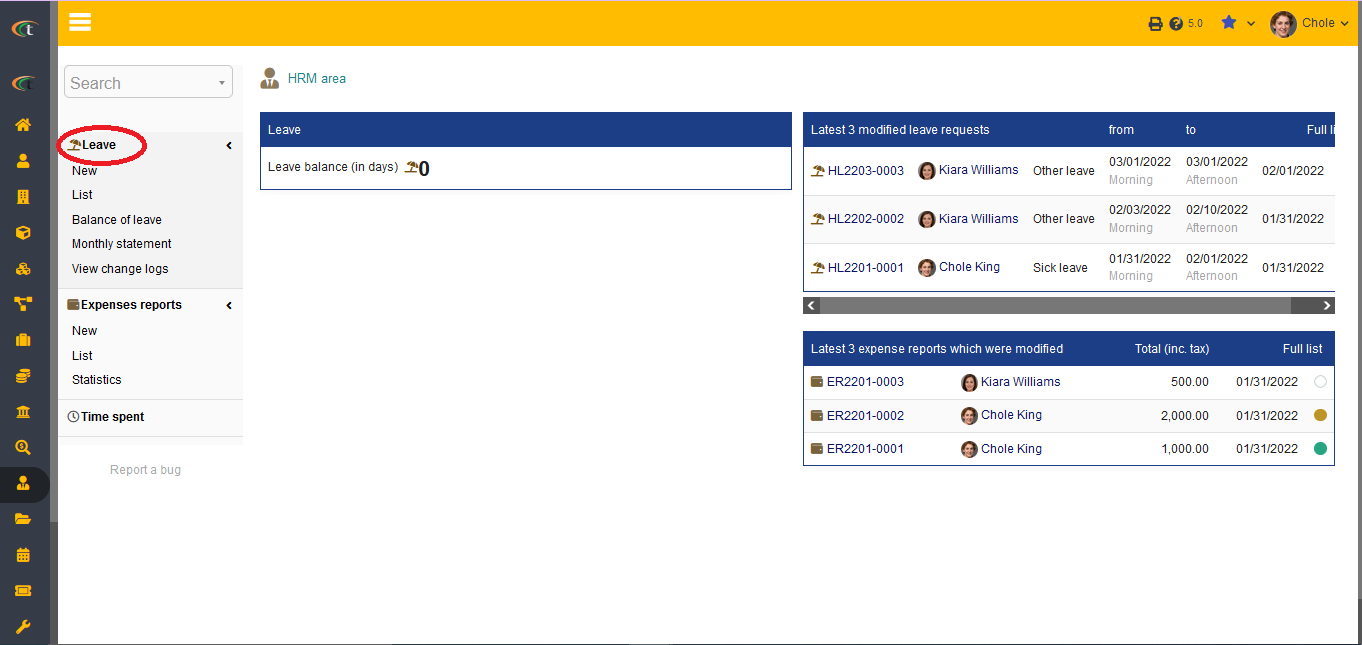
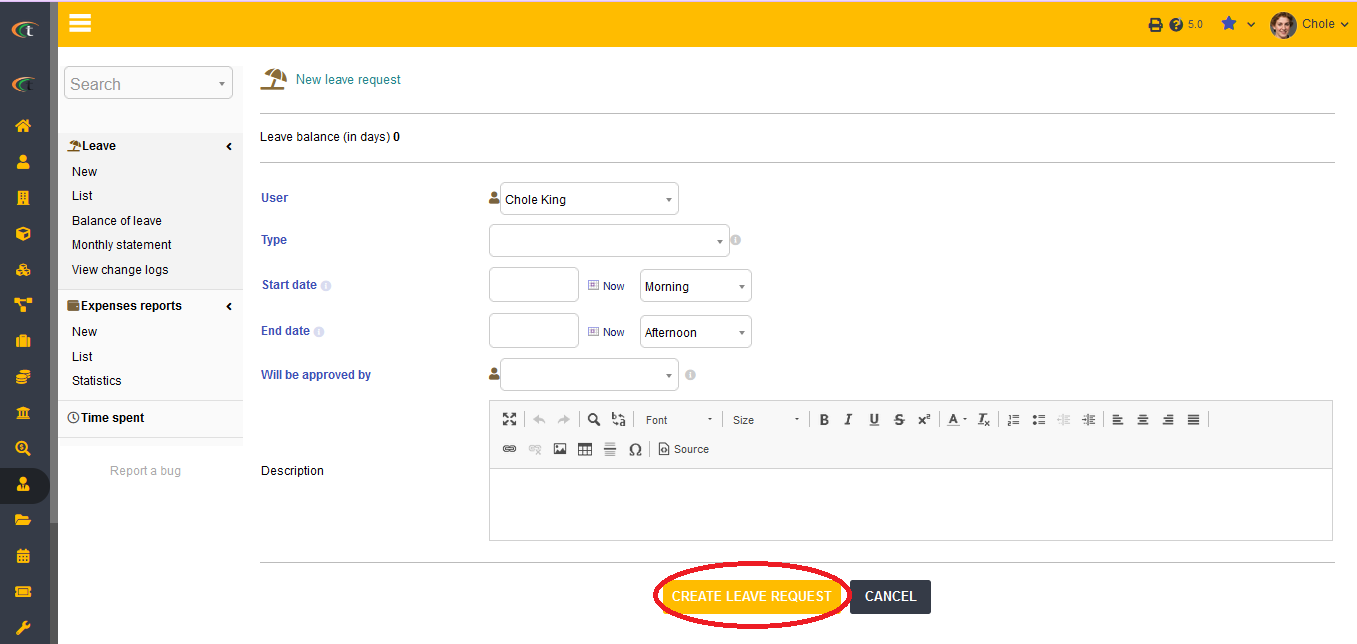
The members can easily create their leaves from their user account by going to the option ''HRM'' section from the main menu bar and then selecting the option of ''New leave''. The users need to incorporate all the details and then press the option of ''create leave request''. The users need to remember that each criteria need to be filled containing the date, reason and other information related to the leaves. | The members can easily create their leaves from their user account by going to the option ''HRM'' section from the main menu bar and then selecting the option of ''New leave''. The users need to incorporate all the details and then press the option of ''create leave request''. The users need to remember that each criteria need to be filled containing the date, reason and other information related to the leaves. If your company has an unusual working day, you can set that easily with Tactic. Even if it’s a Sunday, it can be set as a working day manually. Hence, even if it is a weekend, the users can apply for leave without any interruption. | ||
[[File:Leave_1.PNG|center]] | [[File:Leave_1.PNG|center|link=]] | ||
[[File:Leave_2.PNG|center]] | [[File:Leave_2.PNG|center|link=]] | ||
== Creating a leave for someone else == | |||
If you are an advanced user with a lot of permissions, then you can use those permissions for applying leaves for other users. For achieving this, you need to follow the usual steps for applying a leave and then just choose the user, you want to apply leave for. It will be applied easily. | |||
== Adding files to leave requests == | |||
Adding files to leave request is easily done just with the help of a few steps. All you need to do is to follow the usual steps of leave request creation and keep it in the draft status. Then you need to open the concerned leave request by going through a few steps, '''list -> choose the concerned leave -> Linked files tab -> Attach files/documents -> Browse -> Choose the file -> add. The file will be added to the leave request.''' | |||
= Modifying a leave = | = Modifying a leave = | ||
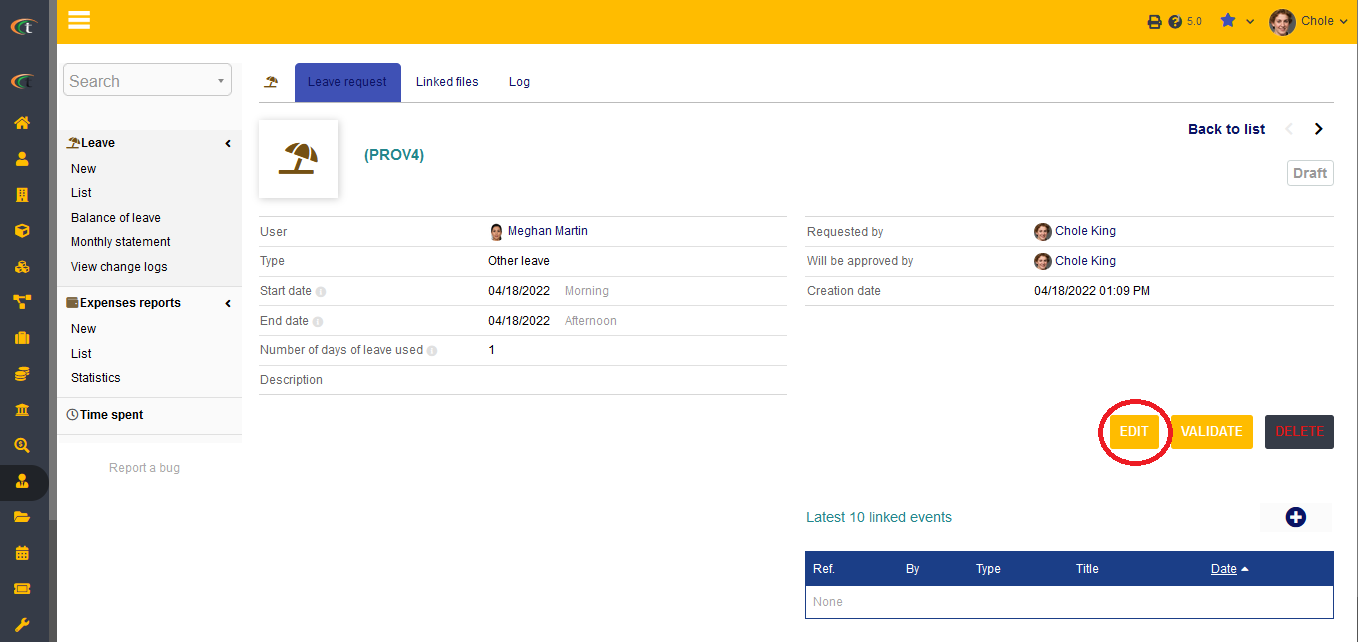
| Line 21: | Line 27: | ||
[[File:Leave_modification_1.PNG|center]] | [[File:Leave_modification_1.PNG|center|link=]] | ||
= Approve or deny a leave = | = Approve or deny a leave = | ||
| Line 29: | Line 35: | ||
= Life cycle of leaves = | = Life cycle of leaves = | ||
The life cycle of a leave starts from the status '''Draft'''. The draft status notifies that the leave does not exist or it is not finished yet. The next status for a leave is the status of validation. Validation means that the leave has been completed, however, it is waiting for being approved by the concerned person. The approval of the leave need to be performed by a supervisor or an admin. The status of the leave will then be changed to '''Approved'''. | The life cycle of a leave starts from the status '''Draft'''. The draft status notifies that the leave does not exist or it is not finished yet. The next status for a leave is the status of '''validation'''. Validation means that the leave has been completed, however, it is waiting for being approved by the concerned person. The approval of the leave need to be performed by a supervisor or an admin. The status of the leave will then be changed to '''Approved'''. | ||
Deleting leaves cannot be performed by everyone. Only certain users have this permission of deleting leaves. However, for deleting a leave the users need to go to the leave list then delete the concerned one. | Deleting leaves cannot be performed by everyone. Only certain users have this permission of deleting leaves. However, for deleting a leave the users need to go to the leave list then delete the concerned one. | ||
== Refusing a leave == | |||
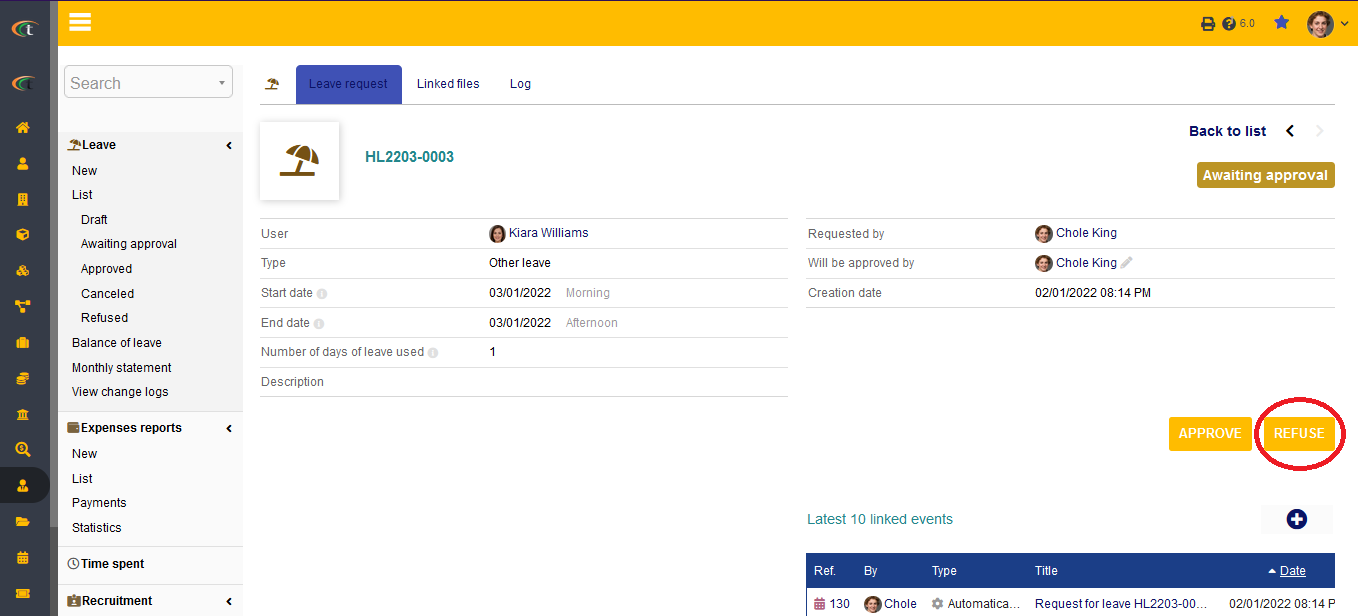
The leaves can be refused after validating those for once. For achieving the same you need to go through some of the steps, which are mentioned below, | |||
'''HRM (from the main menu) -> Leave -> List -> Choose the concerned leave -> Click on the option “refuse” -> a confirmation box will open, in which you will have to incorporate the reason of your refusal -> validate''', You leave will be refused after that. | |||
Step 1 | |||
[[File:Leave_refusal_1.PNG|center|link=]] | |||
Step 2 | |||
[[File:Leave_refusal_2.PNG|center|link=]] | |||
Latest revision as of 08:39, 26 December 2022
Introduction
The employees are the substance of an organisation, hence, cooperating with them is one of the primary tasks that need to be performed by the Human Resource Managers. Managing leaves is one these important tasks, and it need to be done very efficiently for eliminating complication and complexity. The leave module in Tactic helps the employees in dropping their leave requests in accordance to their preferences. This module allows the employees to drop a leave without having to face much issues. The leave request will be delivered to the concerned manager or supervisors, who can either approve or decline those.
Installation
There is no need of installing this module, as it is already included within Tactic services.
Setup
For using this module the users need to enable it by using an administrator account. The menu options for activating this module are: Home –> Setup – > Module. The users then need to click on Activate. The modules will be activated after completing this step. The settings icon will be visible at the end of the module box, the users can click in that to access further setup for this module to access the functionalities in a better way.
Creation of a leave
The members can easily create their leaves from their user account by going to the option HRM section from the main menu bar and then selecting the option of New leave. The users need to incorporate all the details and then press the option of create leave request. The users need to remember that each criteria need to be filled containing the date, reason and other information related to the leaves. If your company has an unusual working day, you can set that easily with Tactic. Even if it’s a Sunday, it can be set as a working day manually. Hence, even if it is a weekend, the users can apply for leave without any interruption.
Creating a leave for someone else
If you are an advanced user with a lot of permissions, then you can use those permissions for applying leaves for other users. For achieving this, you need to follow the usual steps for applying a leave and then just choose the user, you want to apply leave for. It will be applied easily.
Adding files to leave requests
Adding files to leave request is easily done just with the help of a few steps. All you need to do is to follow the usual steps of leave request creation and keep it in the draft status. Then you need to open the concerned leave request by going through a few steps, list -> choose the concerned leave -> Linked files tab -> Attach files/documents -> Browse -> Choose the file -> add. The file will be added to the leave request.
Modifying a leave
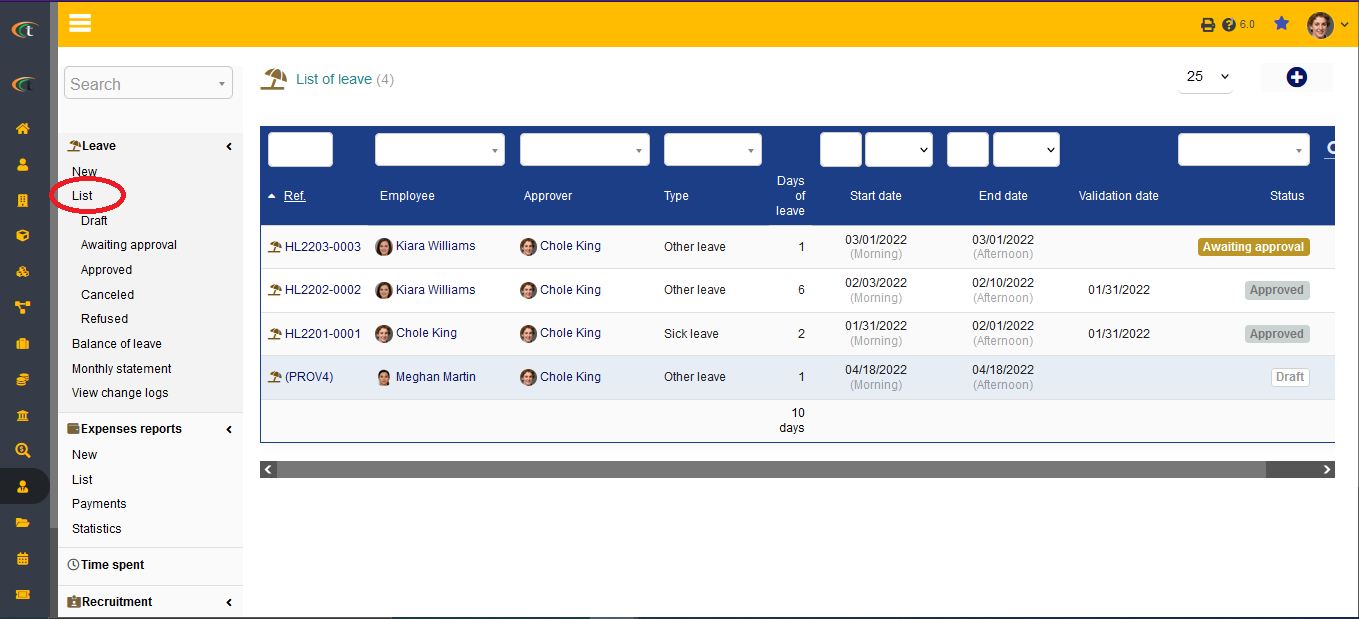
For modification of a leave, the users need to go to the List section for viewing the applied leaves. The users then need to click on the edit option to modify the leaves accordingly. However, leaves only can be modified when they are still in their draft status.
Approve or deny a leave
To approve or deny a leave the users need to go to the leave card. However, user requires permission “Approve/Deny leave” to be able to approve or deny a leave.
Deleting a leave
Clicking on the “Delete” option after going to the leave card is enough to delete the leave.
Life cycle of leaves
The life cycle of a leave starts from the status Draft. The draft status notifies that the leave does not exist or it is not finished yet. The next status for a leave is the status of validation. Validation means that the leave has been completed, however, it is waiting for being approved by the concerned person. The approval of the leave need to be performed by a supervisor or an admin. The status of the leave will then be changed to Approved.
Deleting leaves cannot be performed by everyone. Only certain users have this permission of deleting leaves. However, for deleting a leave the users need to go to the leave list then delete the concerned one.
Refusing a leave
The leaves can be refused after validating those for once. For achieving the same you need to go through some of the steps, which are mentioned below,
HRM (from the main menu) -> Leave -> List -> Choose the concerned leave -> Click on the option “refuse” -> a confirmation box will open, in which you will have to incorporate the reason of your refusal -> validate, You leave will be refused after that.
Step 1
Step 2
