Difference between revisions of "Event Organization"
(→Setup) |
|||
| (3 intermediate revisions by the same user not shown) | |||
| Line 82: | Line 82: | ||
* The attendee will be added to the event | * The attendee will be added to the event | ||
== Add date and location == | |||
Adding the event date and the location can be easily achieved with a few steps now in Tactic. All you need to do is to open the event organization sub menu by click on the Project icon from the main menu, then choose list and browse through the already created events. | |||
[[File:Date-location-of-event-1.PNG|center|link=]] | |||
If you want to add a new event then you can click on New and fill in all the criteria, where you will find the blank space for event location and date. You can add the important details and hit create draft. If you want to modify a created event, you can do so by opening the event card, clicking on modify and adding the information. Lastly, clicking on save will save your event location and date easily. | |||
= Workflow for event organization = | = Workflow for event organization = | ||
| Line 102: | Line 113: | ||
[[File:Event_organization_11.PNG|center|link=]] | [[File:Event_organization_11.PNG|center|link=]] | ||
= Exporting an ICS File = | |||
The users can now export ICS file of an event by only clicking on a link. For downloading the ICS file of an event, you need to follow a few simple steps, which are presented below: | |||
At first you need to access event organization by going to Home -> Projects and collaborating works -> Event Organization. You can now click on the ‘list’ option to open the list of all available events. Once you are done choosing the event you want to work with, you will see a criterion called “Link ICS for conferences”, the link of download will be provided available here. All you need to do is to click on the link and let Tactic download the ICS file for you. | |||
[[File:Exporting-ics-file-1.PNG|center|link=]] | |||
[[File:Exporting-ics-file-2.PNG|center|link=]] | |||
= Deleting an event = | = Deleting an event = | ||
Latest revision as of 08:50, 30 October 2024
Introduction
Events and conferences are common occurrences in any business while managing those properly is a critical need. Managing an event manually means allowing several loopholes as well as taking a lot of time. And here digitization can help. Tactic provides its users with an entire event organization module, that helps you in creating and managing events for your company easily and efficiently.
What does event organization module do
There are a number of tasks, for accomplishing which you can use Tactic’s event organization module. The tasks are mentioned below,
- You can create and manage summits, congresses, forums, training campaigns, DevCamps and more.
- You can collect ideas and votes for specific matter with the help of event organization.
- Collection of payments can be achieved with the help of this module as well.
- Managing conferences are easy with the help of this module.
- If any of your event requires registration fee you can also collect that with the help of this module.
Installation
There is no need of installing this module, as it is already included within Tactic services.
Setup
For using this module the users need to enable it by using an administrator account. The menu options for activating this module are: Home –> Setup – > Module. The users then need to click on Activate. The modules will be activated after completing this step. The settings icon will be visible at the end of the module box, the users can click in that to access further setup for this module to access the functionalities in a better way.
List of parameters associated with the module
These parameters are a part of module set-up. The users can either enable or disable these parameters for using the Event Organization module as per their preferences. For enabling these parameters follow the following steps,
- Home -> Setup -> Modules and applications
- Go to the Event Organization module
- Click on the cog sign to open the settings
- Click on “modify” to modify the parameters as per your own liking
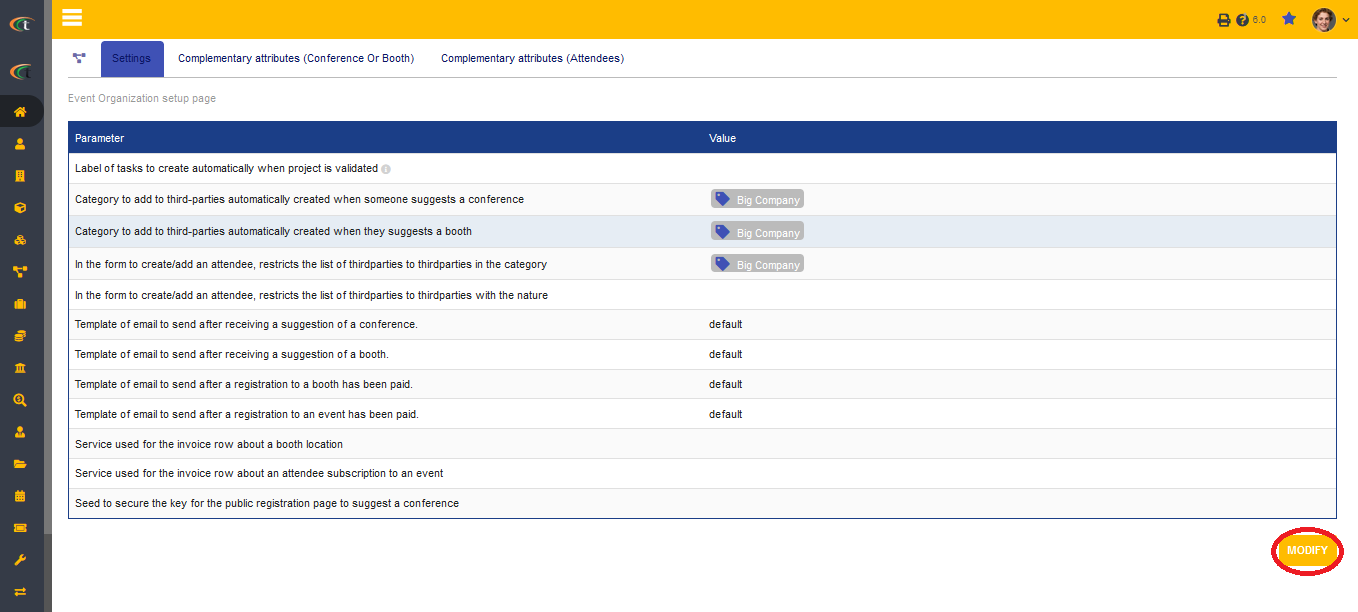
- Click on “save” after you are done with the modification
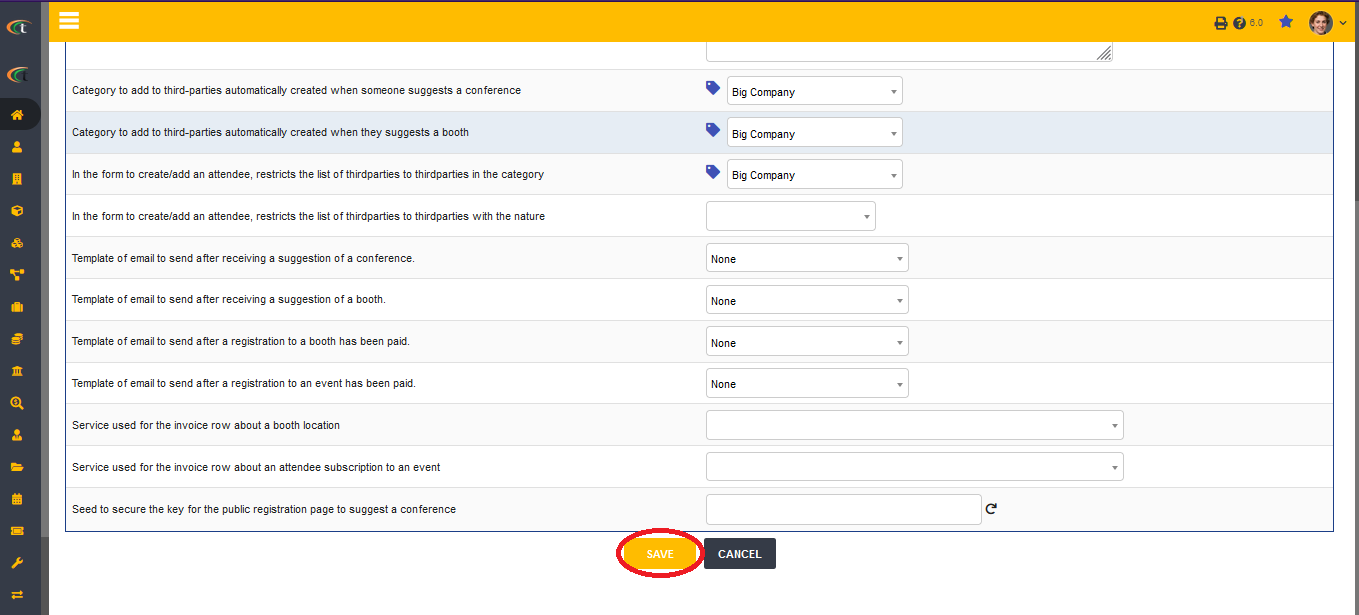
1. Creating task labels automatically when validating a project is done
As per your preferences you can define a list of standard tasks, which will be created automatically by Tactic once a new event is validated.
2. Adding tags to third parties automatically when a conference is suggested
If there is any specific tag that you want the third parties to be added to you can define it in the configuration area. These tags will be automatically added to the third parties when a conference is suggested with the submission of a public form.
3. Adding tags to third parties automatically when a booth is suggested
If there is any specific tag that you want the third parties to be added to you can define it in the configuration area. These tags will be automatically added to the third parties when a booth is suggested with the submission of a public form.
4. Add and restrict attendees by tag or category
You can freely add and restrict third parties in your created events with the help of tags. Just mentioning the tag or category will be enough to add or restrict the entire group of third party easily.
5. Add and restrict attendees by nature
Just like with the help of tags, the users can add and restrict third parties based on their nature as well. For example, if you want to add only prospects then you can add prospect in the configuration area and Tactic will add only prospects to the created events.
6. Template of the email to be sent after a conference suggestion is received
You can add the template of the email that is needed to be sent after a conference suggestion is received.
7. Template of the email to be sent after a booth suggestion is received
You can add the template of the email that is needed to be sent after a booth suggestion is received.
8. Template of the email to be sent after a payment for conference/ booth registration is received
You can add the template of the email that is needed to be sent after registration fee for booth/ conference is received. The above-mentioned parameters are the primary ones. There are some other parameters as well, such as Service used for the invoice row about a booth location, Service used for the invoice row about an attendee subscription to an event and Seed to secure the key for the public registration page to suggest a conference.
Creating a new event
For creating a new event you need to follow the below-mentioned steps,
- First you need to choose the “Projects” menu from the main menu bar
- Choose the option of “Organized events” from the sub menu
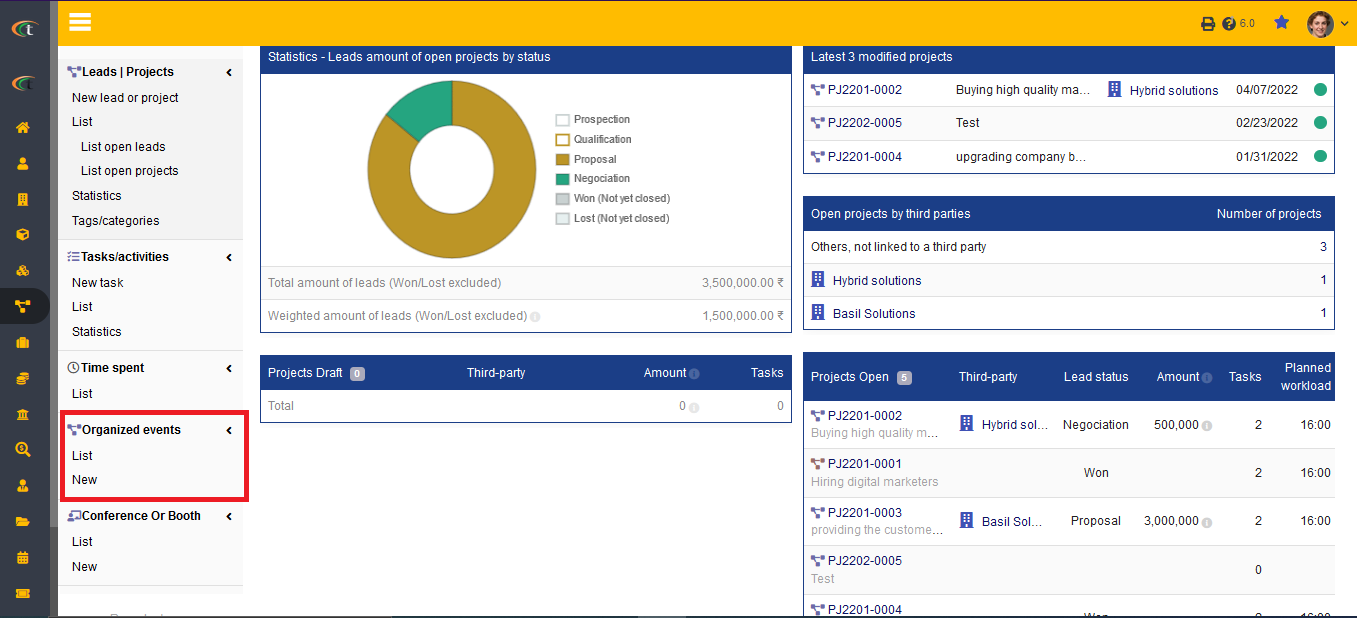
- Choose “new” from the options that appear under the sub menu
- Fill all the needed criteria
- Click on “create draft”
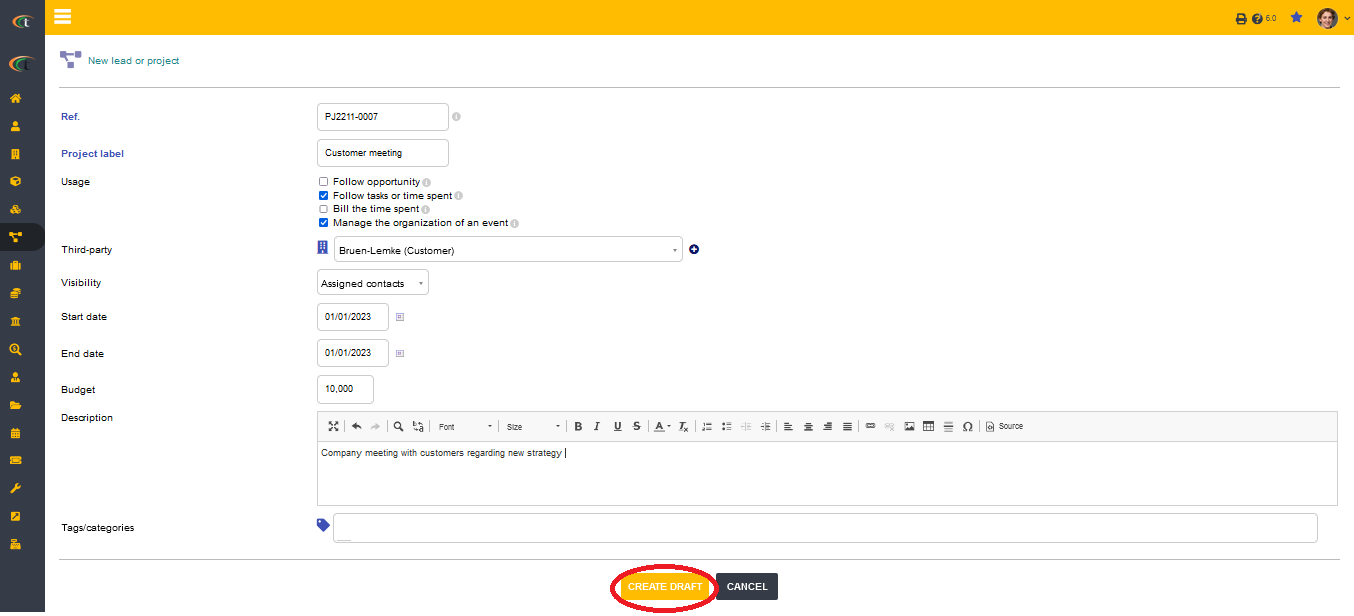
- After that your draft event will be created and you can validate it as per you need.
- For validating the draft even, just click on “validate”
Add an attendee
- After you validate the event, you can add attendees by opening the event from the list view, which can be done by clicking on “list”.
- Click on your desired event and it will open
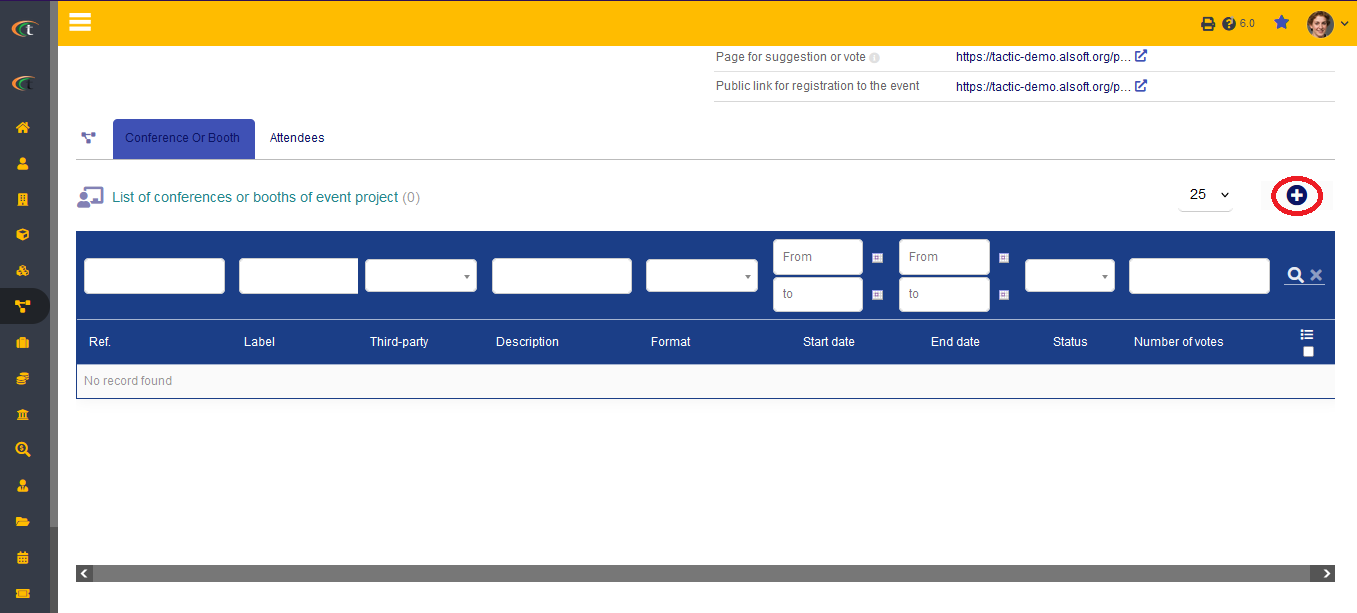
- Click on the “+” to add an attendee
- Fill all the important criteria and click on the option of “create”
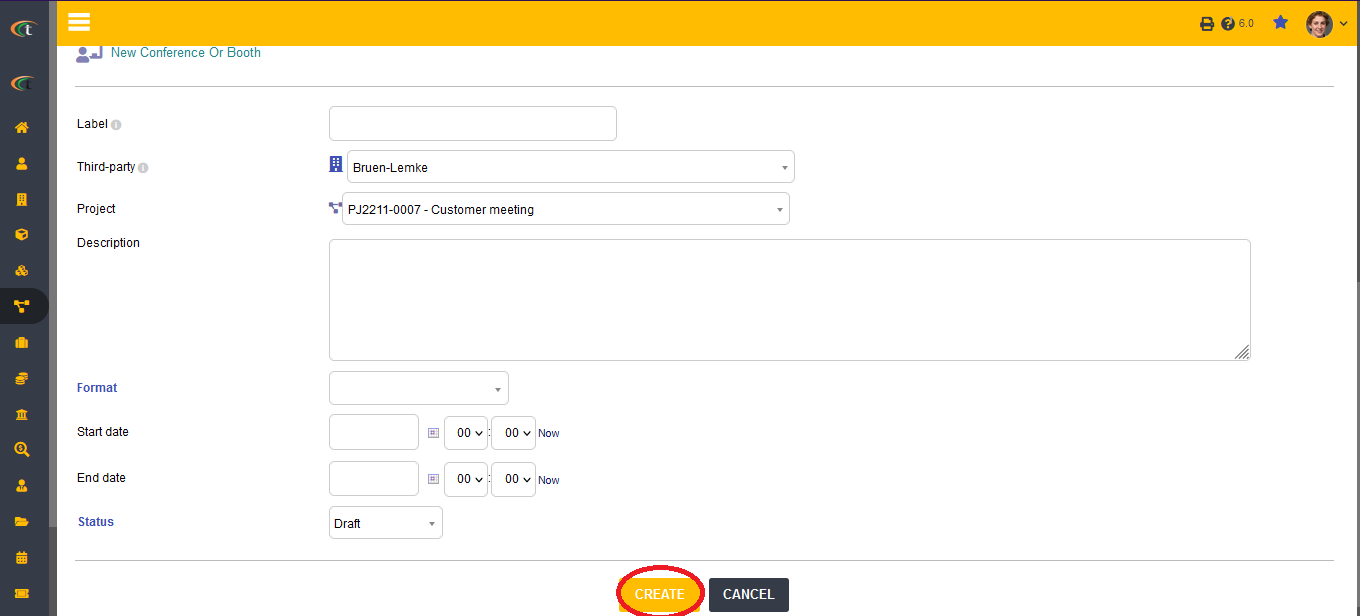
- The attendee will be added to the event
Add date and location
Adding the event date and the location can be easily achieved with a few steps now in Tactic. All you need to do is to open the event organization sub menu by click on the Project icon from the main menu, then choose list and browse through the already created events.
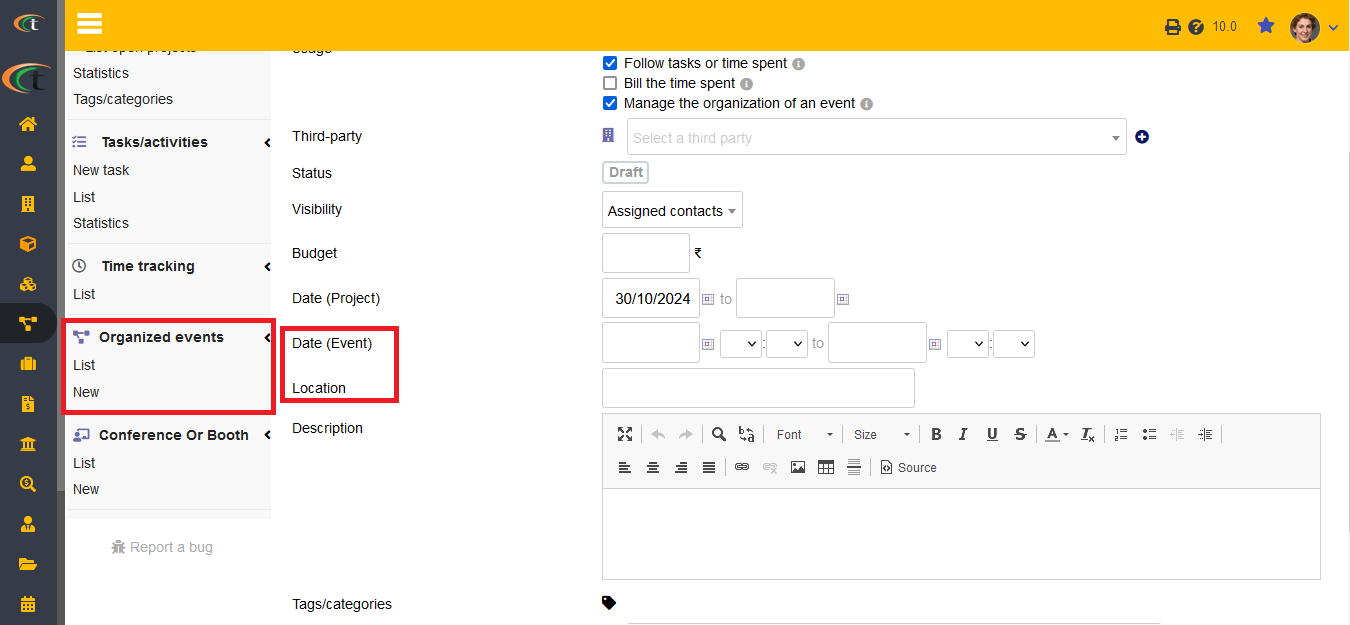
If you want to add a new event then you can click on New and fill in all the criteria, where you will find the blank space for event location and date. You can add the important details and hit create draft. If you want to modify a created event, you can do so by opening the event card, clicking on modify and adding the information. Lastly, clicking on save will save your event location and date easily.
Workflow for event organization
Understanding the workflow of the events is important to manage those properly with the help of Tactic.
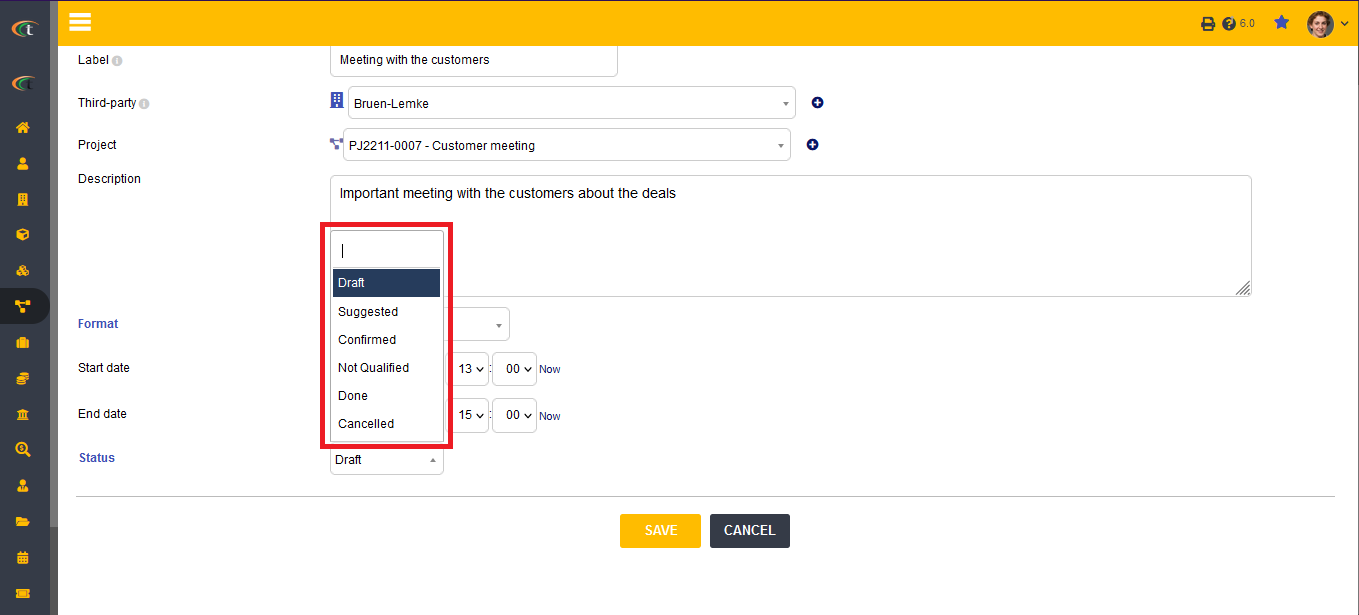
- If an event is in draft, it means the event is not yet ready to be published.
- If an event is suggested, it means it is not confirmed by the visitors’ votes
- If an event is confirmed, it means it is available to be booked.
- If an event is not qualified, it means the votes are not enough to confirm an event
- Done means the event is over
- Cancelled means the event has been cancelled
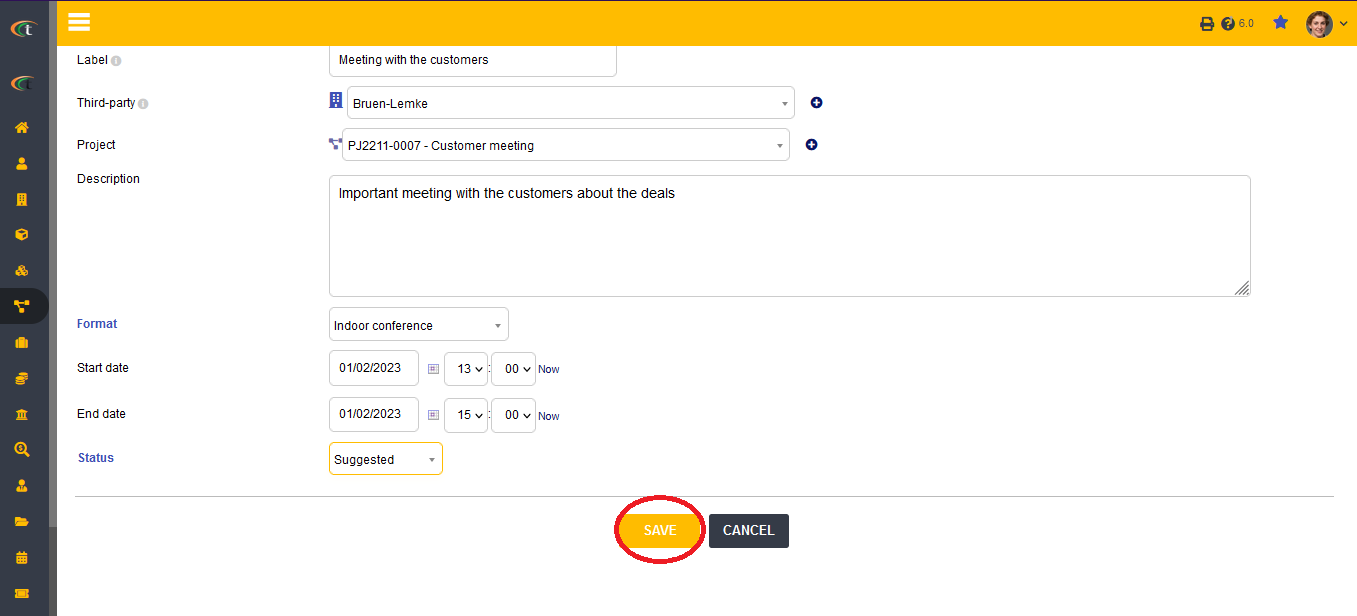
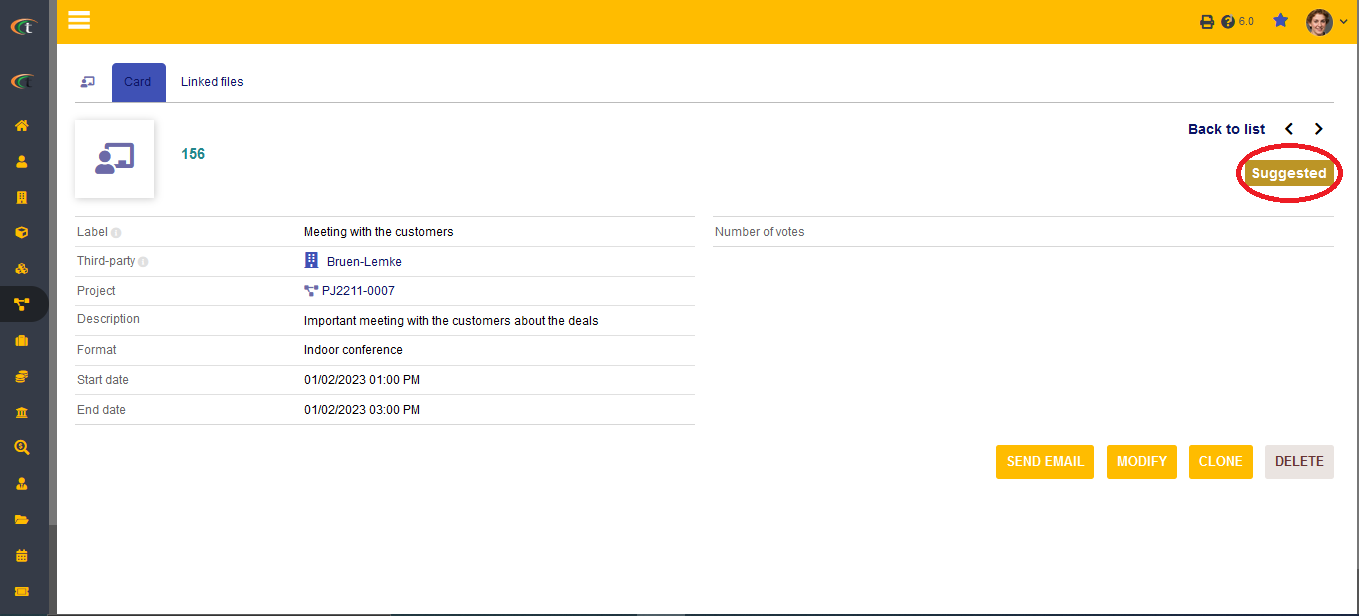
you can change the status of the event by modifying the conference card. You can manually change the status by clicking on the drop-down arrow and choosing the status of the event and then saving it. The new status will reflect on the conference card.
Exporting an ICS File
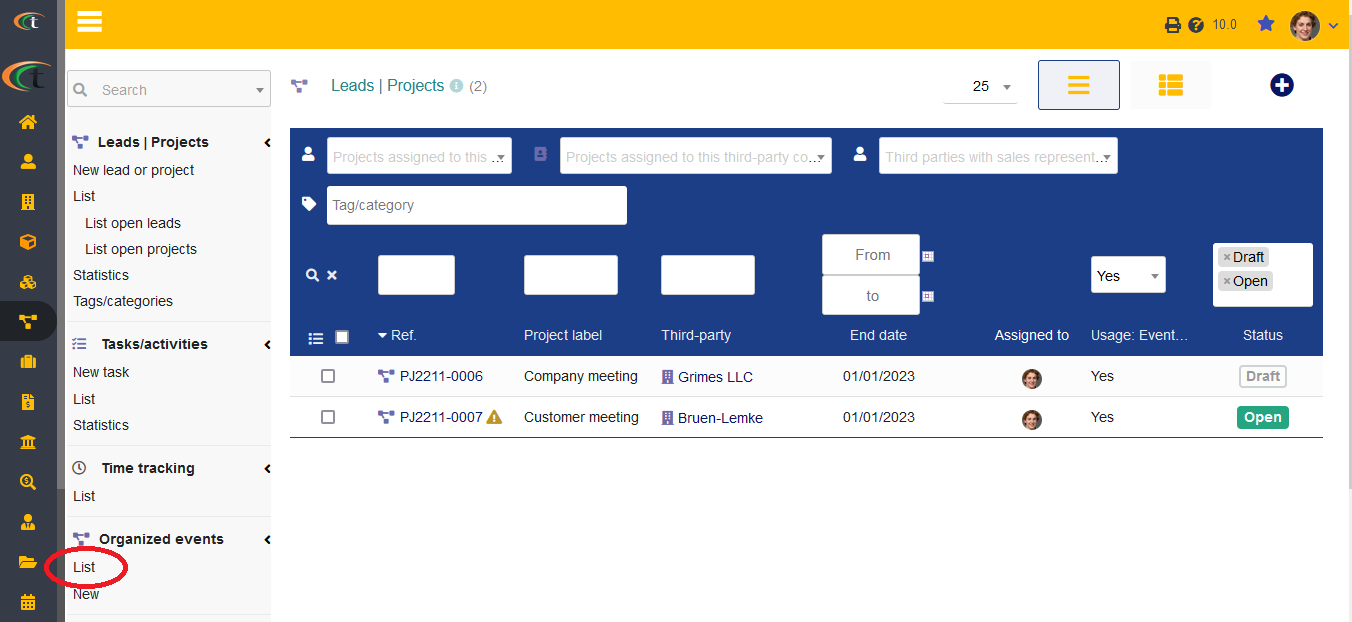
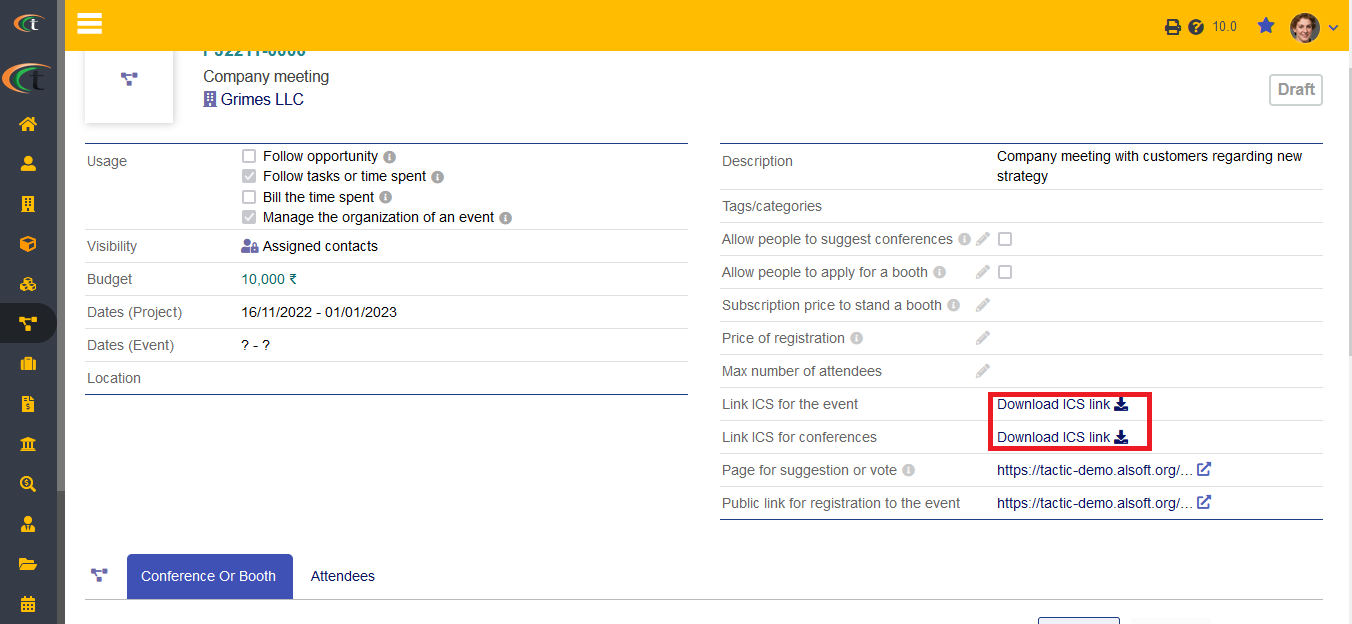
The users can now export ICS file of an event by only clicking on a link. For downloading the ICS file of an event, you need to follow a few simple steps, which are presented below:
At first you need to access event organization by going to Home -> Projects and collaborating works -> Event Organization. You can now click on the ‘list’ option to open the list of all available events. Once you are done choosing the event you want to work with, you will see a criterion called “Link ICS for conferences”, the link of download will be provided available here. All you need to do is to click on the link and let Tactic download the ICS file for you.
Deleting an event
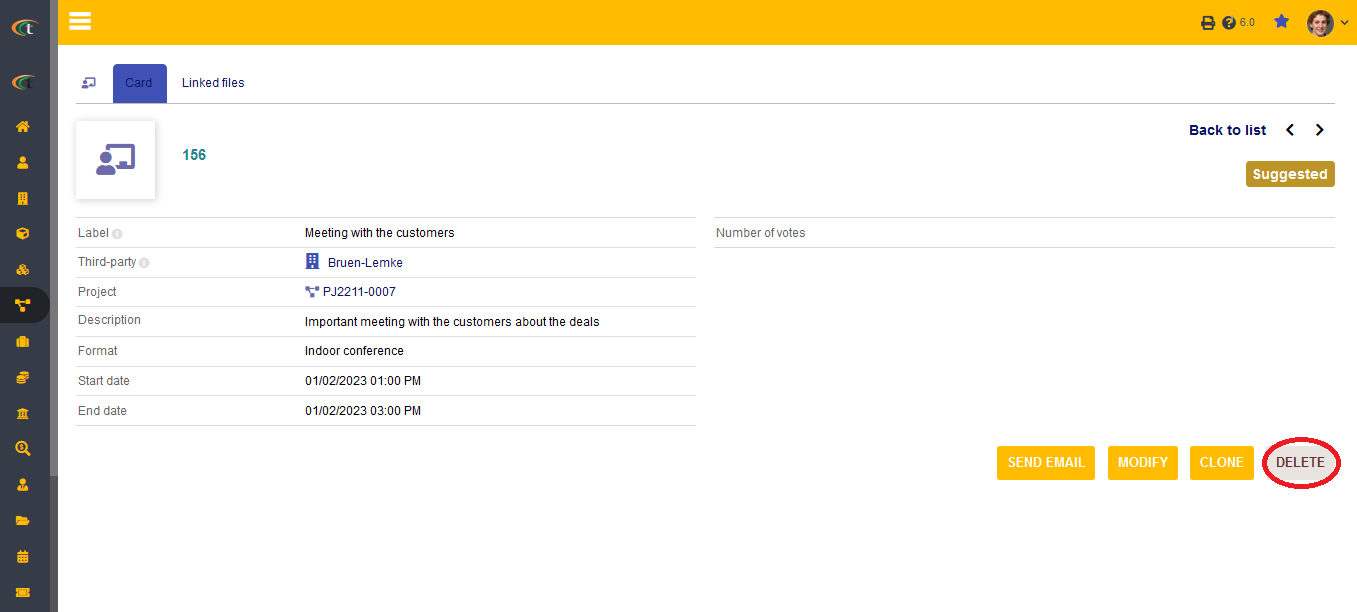
For deleting an event, you need to go to the event list from the option, “conference or booth”, which is located in the side menu bar. Click on the “list” option and choose the desired conference or booth from the list. Click on the “delete” button after opening the event card, which will lead towards the deletion of the conference or booth.
