Difference between revisions of "Projects or Leads Module"
(Created page with "= Introduction = The project module of Tactic can be termed as one of the most important modules. This module possess a number of purpose, which include following leads and opportunities, managing projects and tasks, keeping a track of time that has been consumed during the execution of a specific project. = Installation = There is no need of installing this module, as it is already included within Tactic services. = Setup = For using this module the users need to enabl...") |
|||
| (20 intermediate revisions by 2 users not shown) | |||
| Line 4: | Line 4: | ||
There is no need of installing this module, as it is already included within Tactic services. | There is no need of installing this module, as it is already included within Tactic services. | ||
= Setup = | = Setup = | ||
For using this module the users need to enable it by using an administrator account. The menu options for activating this module are: '''Home –> Setup – > Module'''. The users then need to click on '''Activate'''. The modules will be activated after completing this step. | For using this module the users need to enable it by using an administrator account. The menu options for activating this module are: '''Home –> Setup – > Module'''. The users then need to click on '''Activate'''. The modules will be activated after completing this step. The settings icon {{#fas:cog}} will be visible at the end of the module box, the users can click in that to access further setup for this module to access the functionalities in a better way. | ||
= Functionalities of Project Module = | = Functionalities of Project Module = | ||
* The users can add predefined fields of choice in order to manage the data with more efficiency | * The users can add predefined fields of choice in order to manage the data with more efficiency | ||
| Line 12: | Line 13: | ||
* Sub-task can be added along with the hierarchy of tasks | * Sub-task can be added along with the hierarchy of tasks | ||
* If there is an hourly rate is added to the user card, the cost for every spent hour will also be calculated and reported | * If there is an hourly rate is added to the user card, the cost for every spent hour will also be calculated and reported | ||
* Project module supports status of project and end date | |||
* There is also a criterion to show opportunity of the project’s success. You can either add or modify it as per your preference. The process is explained below, | |||
Projects & leads menu (from main menu) -> list -> choose the concerned task or click on new project -> fill in the “opportunity” section -> save. The opportunity for the particular project will be updated. | |||
* Multiple users can be assigned to multiple projects at once via mass-action. | |||
It is now easy to assign multiple members to a project at once, you only need to run a mass-action. For achieving the same you need to access the project list from home -> project and collaborative work main menu -> projects -> list. Now you need to scroll to the right and choose the projects that you need to work with. Once you are done choosing you will see a new box appearing at the beginning of the page. | |||
There are three different criteria, in the first one you need to choose the users who are to be assigned, in the second one you need to choose the role of the users in the context of the project, in the third box you need to choose the role of the users in the content of the tasks. Once you are done, click on validate. Your users will be assigned just like that. | |||
= Creation of a project = | = Creation of a project = | ||
A project can be created directly from the project module. The users can add ant third-party to draft a project. Members can be added to each project as well. The users will also be able to assign participants. The status if the projects can be updated and changed as per the progress of the project. | A project can be created directly from the project module. The users can add ant third-party to draft a project. Members can be added to each project as well. The users will also be able to assign participants. The status if the projects can be updated and changed as per the progress of the project. | ||
[[File:Project_1.PNG|center|link=]] | |||
[[File:Project_2.PNG|center|link=]] | |||
[[File:Project_3.PNG|center|link=]] | |||
Modification can be done by clicking on the option of '''Modify'''. | |||
[[File:Project_4.PNG|center|link=]] | |||
Deletion can be done by clicking on the option of '''Delete'''. | |||
[[File:Project_5.PNG|center|link=]] | |||
== Adding a contact == | |||
Projects & leads module in Tactic allows the users to manage their company projects in more convenient and easier manner. Hence, the users are also allowed to add contacts to the projects for better performance. For adding contacts to the projects, the users need to follow a few steps, which are, | |||
Projects & leads module (from the main menu) -> leads | projects -> list -> choose the concerned project -> contacts of project tab -> add the contacts as per your requirement by clicking on the drop-down arrow -> click on “add”. You can also choose the role of the contact from the two available option, contributor, and project leader. The contacts of the project will be updated accordingly. | |||
[[File:Contact_in_project_1.PNG|center|link=]] | |||
[[File:Contact_in_project_2.PNG|center|link=]] | |||
[[File:Contant_in_project_3.PNG|center|link=]] | |||
== Adding a project to contract == | |||
The users can also add projects to contracts while creating those. It is done by going through an easy process. Go to commerce (from main menu) -> contracts -> new contract -> fill in the criteria -> go to the project field -> add the project by clicking on the drop-down menu -> save. The project will be added to the contract very easily. | |||
== Workload == | |||
There is a workload field on the tasks, this field suggest the amount of time that the task should be provided with. You can add workload while creating a new task or modify the existing ones. The method of accomplishing the same are provided below, | |||
Projects & leads menu (from main menu) -> Task -> list -> choose the concerned task or click on new task -> fill in the “planned workload” section -> save. The workload for your task will be saved easily. | |||
= Cloning a project = | |||
If you are cloning a project, all the elements that are associated with such as the tasks, files, and contacts, will be cloned with the project as well. For cloning you need to follow a few steps, which are projects & leads menu (from main menu) -> list -> choose the concerned project -> click on “clone” -> confirm by clicking on “yes” -> the cloning will be completed as the clone project will be created in the draft state. | |||
= Other Information = | |||
* The budget fields can be added in the tasks just as the projects. | |||
* If you are looking for a specific project, you can easily filter in the search area by date from and to and easily find the one you are looking for amid a bunch of other projects. This filter works for contact as well, you can filter your projects based on the contacts associated with the same. | |||
* For viewing the Gantt diagrams, you need to go to the Project menu -> list -> choose the concerned project -> tasks tab -> List of task -> choose the second icon -> the Gantt view will be shown. | |||
* Tactic by default created an event whenever a project is created. Hence, you can keep a track of project creation dates with the help of event & agenda module as well. | |||
* If the salary module is activated, you can also add hourly value to the projects based on the users, who the projects are assigned to. | |||
* Tactic provides the users with the facility of adding project tasks to agenda in order to create event form. For adding task to an agenda, the users need to follow some steps for accomplishing it. | |||
* Agenda (from main menu) -> new event -> fill in all the important criteria -> fill in the task section by choosing the task from the drop-down menu -> add. The new agenda will be added along with the task as well as the project. | |||
Latest revision as of 09:12, 5 October 2024
Introduction
The project module of Tactic can be termed as one of the most important modules. This module possess a number of purpose, which include following leads and opportunities, managing projects and tasks, keeping a track of time that has been consumed during the execution of a specific project.
Installation
There is no need of installing this module, as it is already included within Tactic services.
Setup
For using this module the users need to enable it by using an administrator account. The menu options for activating this module are: Home –> Setup – > Module. The users then need to click on Activate. The modules will be activated after completing this step. The settings icon will be visible at the end of the module box, the users can click in that to access further setup for this module to access the functionalities in a better way.
Functionalities of Project Module
- The users can add predefined fields of choice in order to manage the data with more efficiency
- The visualisation of a project can be set by the users or the admins. The projects can be published as “public” to be visible to every person of the company. Or it can be limited to only a group of employees and/or partners.
- There is a feature to count time that is spent on a specific project
- Estimated progress can be added to the task as well
- Sub-task can be added along with the hierarchy of tasks
- If there is an hourly rate is added to the user card, the cost for every spent hour will also be calculated and reported
- Project module supports status of project and end date
- There is also a criterion to show opportunity of the project’s success. You can either add or modify it as per your preference. The process is explained below,
Projects & leads menu (from main menu) -> list -> choose the concerned task or click on new project -> fill in the “opportunity” section -> save. The opportunity for the particular project will be updated.
- Multiple users can be assigned to multiple projects at once via mass-action.
It is now easy to assign multiple members to a project at once, you only need to run a mass-action. For achieving the same you need to access the project list from home -> project and collaborative work main menu -> projects -> list. Now you need to scroll to the right and choose the projects that you need to work with. Once you are done choosing you will see a new box appearing at the beginning of the page. There are three different criteria, in the first one you need to choose the users who are to be assigned, in the second one you need to choose the role of the users in the context of the project, in the third box you need to choose the role of the users in the content of the tasks. Once you are done, click on validate. Your users will be assigned just like that.
Creation of a project
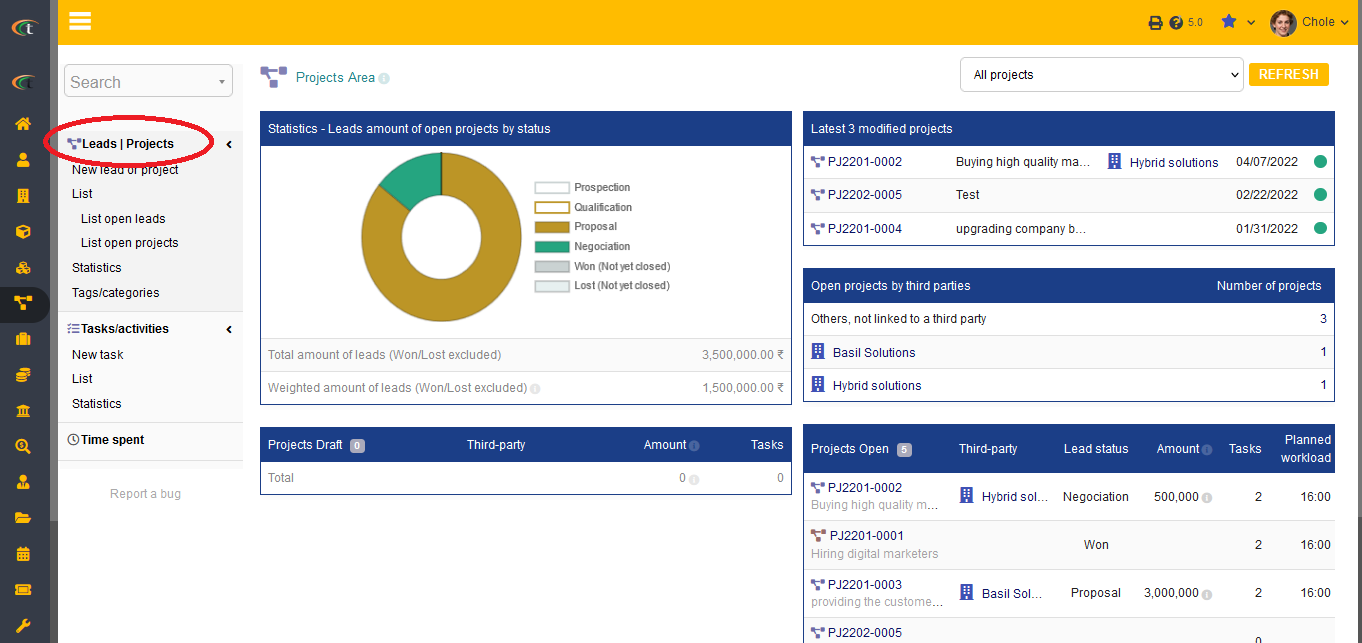
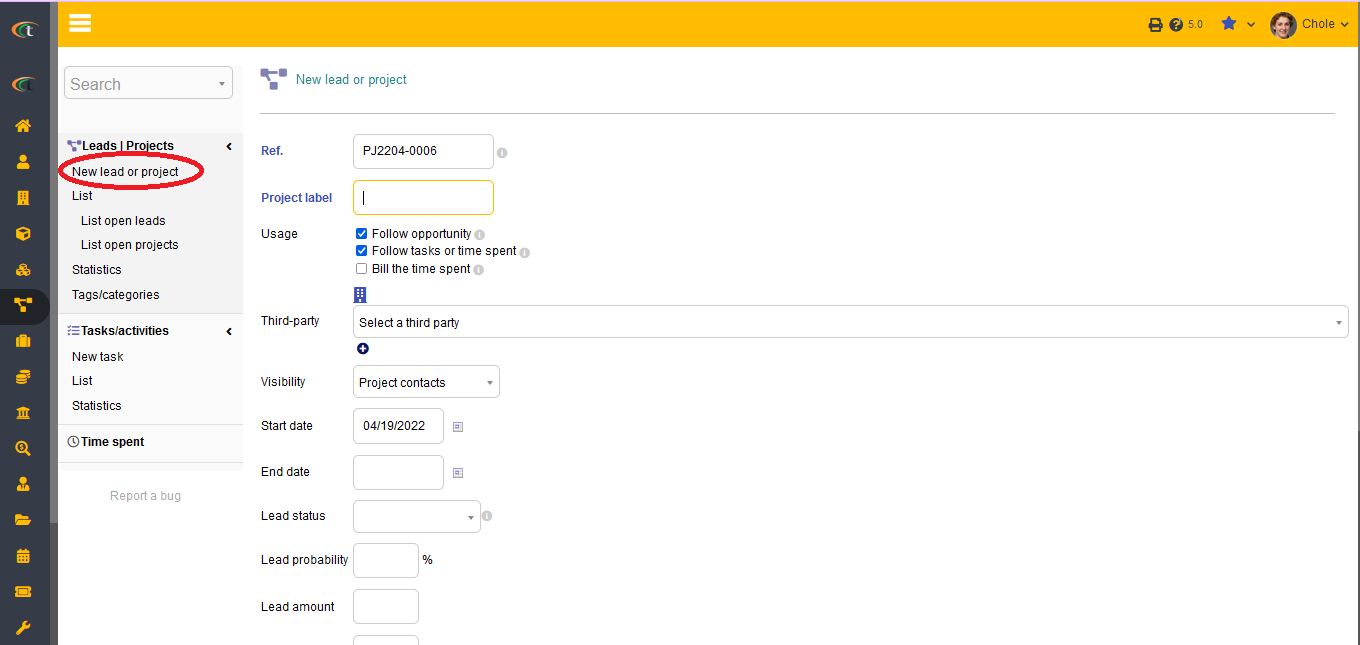
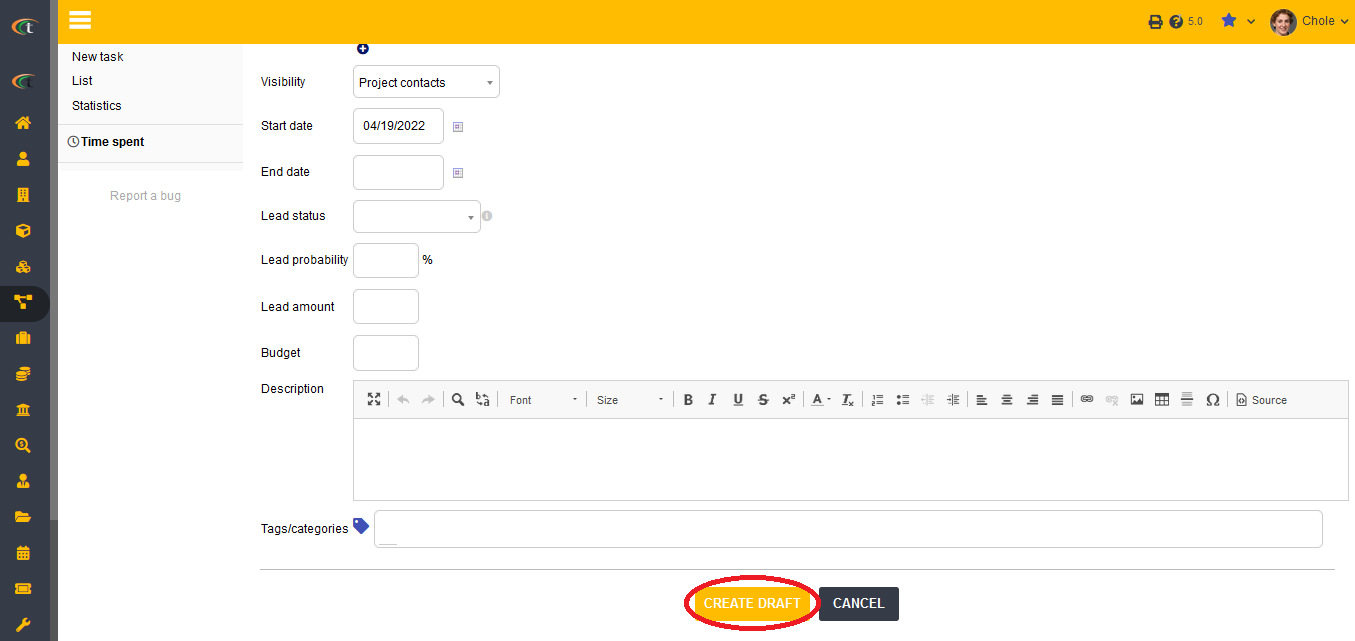
A project can be created directly from the project module. The users can add ant third-party to draft a project. Members can be added to each project as well. The users will also be able to assign participants. The status if the projects can be updated and changed as per the progress of the project.
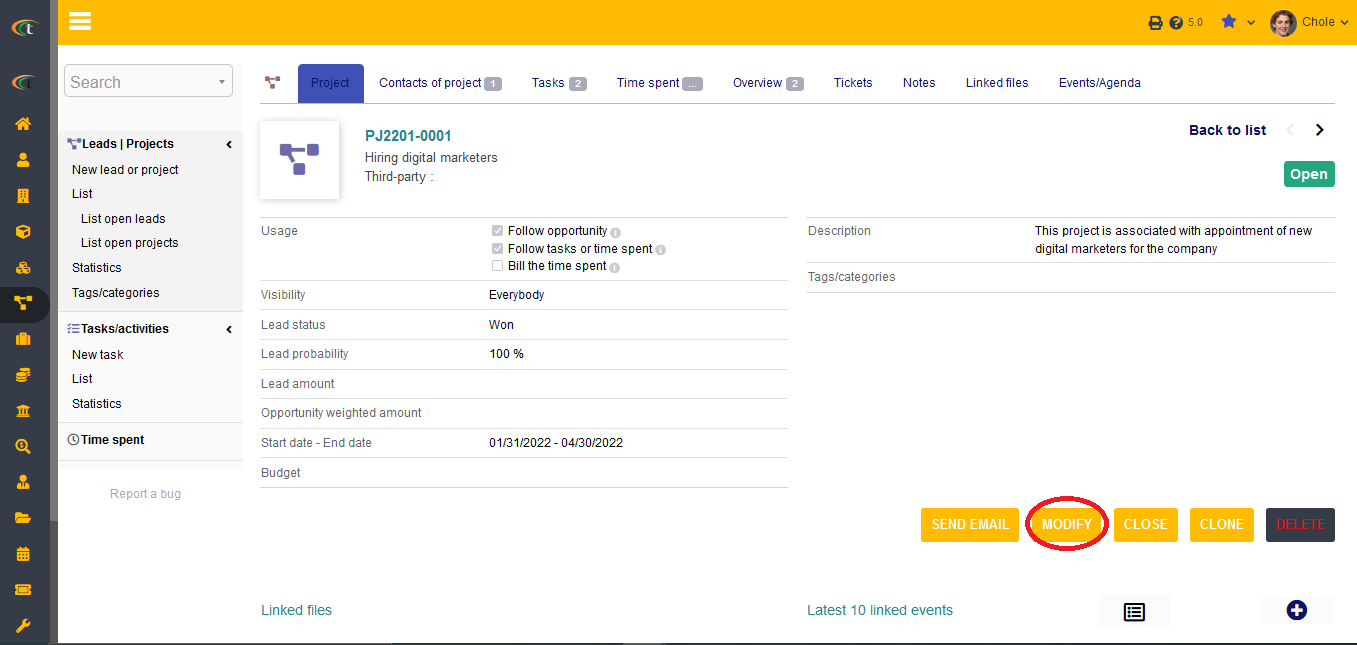
Modification can be done by clicking on the option of Modify.
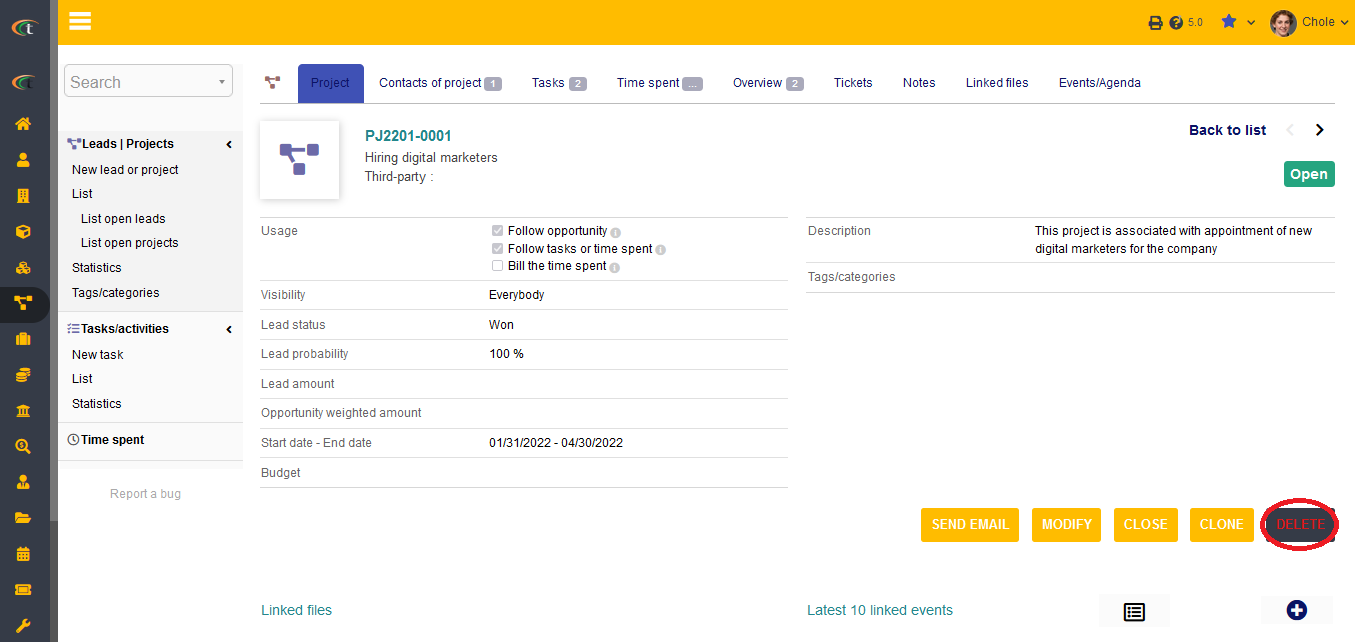
Deletion can be done by clicking on the option of Delete.
Adding a contact
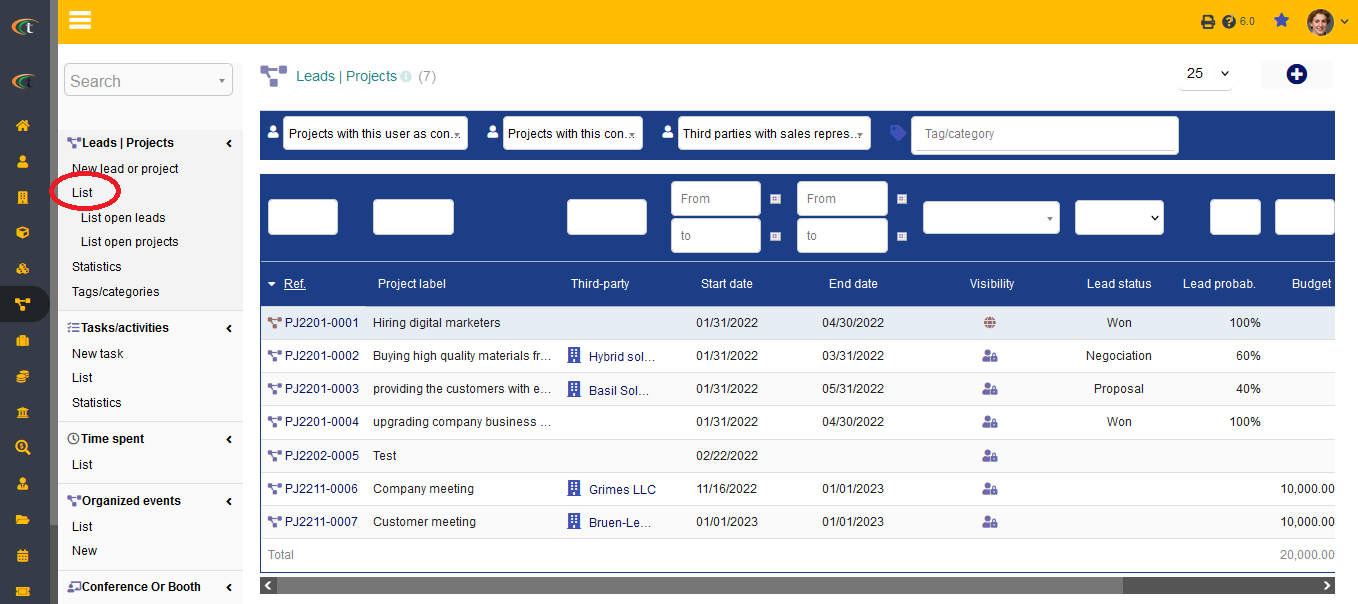
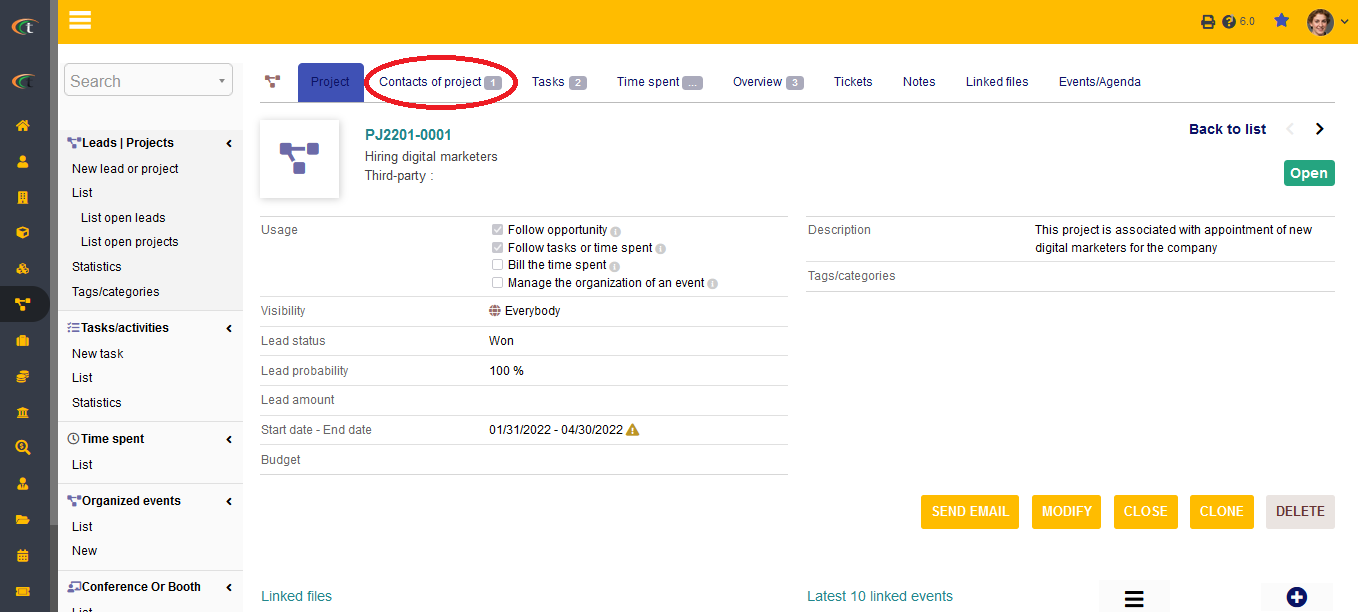
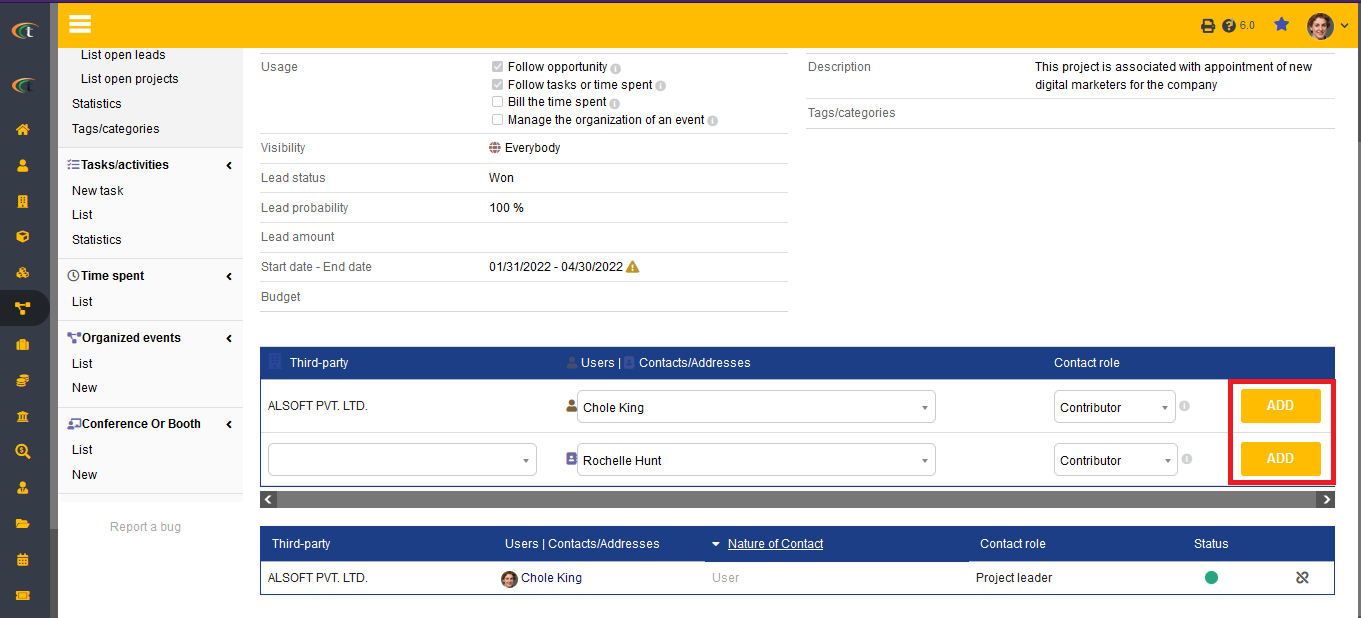
Projects & leads module in Tactic allows the users to manage their company projects in more convenient and easier manner. Hence, the users are also allowed to add contacts to the projects for better performance. For adding contacts to the projects, the users need to follow a few steps, which are,
Projects & leads module (from the main menu) -> leads | projects -> list -> choose the concerned project -> contacts of project tab -> add the contacts as per your requirement by clicking on the drop-down arrow -> click on “add”. You can also choose the role of the contact from the two available option, contributor, and project leader. The contacts of the project will be updated accordingly.
Adding a project to contract
The users can also add projects to contracts while creating those. It is done by going through an easy process. Go to commerce (from main menu) -> contracts -> new contract -> fill in the criteria -> go to the project field -> add the project by clicking on the drop-down menu -> save. The project will be added to the contract very easily.
Workload
There is a workload field on the tasks, this field suggest the amount of time that the task should be provided with. You can add workload while creating a new task or modify the existing ones. The method of accomplishing the same are provided below,
Projects & leads menu (from main menu) -> Task -> list -> choose the concerned task or click on new task -> fill in the “planned workload” section -> save. The workload for your task will be saved easily.
Cloning a project
If you are cloning a project, all the elements that are associated with such as the tasks, files, and contacts, will be cloned with the project as well. For cloning you need to follow a few steps, which are projects & leads menu (from main menu) -> list -> choose the concerned project -> click on “clone” -> confirm by clicking on “yes” -> the cloning will be completed as the clone project will be created in the draft state.
Other Information
- The budget fields can be added in the tasks just as the projects.
- If you are looking for a specific project, you can easily filter in the search area by date from and to and easily find the one you are looking for amid a bunch of other projects. This filter works for contact as well, you can filter your projects based on the contacts associated with the same.
- For viewing the Gantt diagrams, you need to go to the Project menu -> list -> choose the concerned project -> tasks tab -> List of task -> choose the second icon -> the Gantt view will be shown.
- Tactic by default created an event whenever a project is created. Hence, you can keep a track of project creation dates with the help of event & agenda module as well.
- If the salary module is activated, you can also add hourly value to the projects based on the users, who the projects are assigned to.
- Tactic provides the users with the facility of adding project tasks to agenda in order to create event form. For adding task to an agenda, the users need to follow some steps for accomplishing it.
- Agenda (from main menu) -> new event -> fill in all the important criteria -> fill in the task section by choosing the task from the drop-down menu -> add. The new agenda will be added along with the task as well as the project.