Difference between revisions of "User module"
| (15 intermediate revisions by 2 users not shown) | |||
| Line 1: | Line 1: | ||
= Introduction = | = Introduction = | ||
'' | ''In the course of an ERP & CRM software there need to be a group of people or an individual, who manages the access and directs the entire software as per the organisational need. The people who are the one to manage the access are called “User”. The users play a very vital role in the management of data in the ERP & CRM software, as they decides the limitation of access and permission for other users or members of the organisation. Hence, it can be stated that the user module is the most important and a mandatory part of the ERP & CRM systems. Tactic has followed that path as well and enhanced the user module with advanced efficiency for increasing positive impact on the customers. '' User module is considered to be the most important module to exist in Tactic. This module cannot be disabled as it defines the primary working structure of Tactic. The goal of this module is to manage users, groups and their permissions. | ||
= Installation = | = Installation = | ||
There is no need of installing this module, as it is already included within Tactic services. | There is no need of installing this module, as it is already included within Tactic services. | ||
= Setup = | = Setup = | ||
For using this module the users need to enable it by using an administrator account. The menu options for activating this module are: '''Home –> Setup – > Module'''. The users then need to click on '''Activate'''. The modules will be activated after completing this step. The settings icon {{#fas:cog}} will be visible at the end of the module box, the users can click in that to access setup. | For using this module the users need to enable it by using an administrator account. The menu options for activating this module are: '''Home –> Setup – > Module'''. The users then need to click on '''Activate'''. The modules will be activated after completing this step. The settings icon {{#fas:cog}} will be visible at the end of the module box, the users can click in that to access further setup for this module for accessing the functionalities in a better way. | ||
= Life cycle of user module = | = Life cycle of user module = | ||
| Line 13: | Line 13: | ||
[[File: | [[File:User_1.PNG|center|link=]] | ||
[[File:User_module_2.PNG|center]] | [[File:User_module_2.PNG|center|link=]] | ||
[[File:User_module_3.PNG|center]] | [[File:User_module_3.PNG|center|link=]] | ||
Adding the date of birth of user can be done while creating a new user by filling the right criteria. It can also be achieved by modifying a user by clicking on the “modify” option after opening a user card. And then clicking on save. | |||
Just like the birthdays of the users, you can now add their employment anniversary too. For adding employment anniversary of the users, you need to open their user card first by following the steps of home -> users and groups -> user list -> choose the user you want to work with -> click on modify button once the user card opens -> scroll towards the end of the page -> put on employment date in the ‘Employment’ box -> click on save. | |||
[[File:Employment-date.PNG|center|link=]] | |||
The user’s employment anniversary will be saved to Tactic now. | |||
== Creation of an external user == | == Creation of an external user == | ||
Creation of an external user is a little bit different from creating of an internal user. However, the users can create external users account without having to face much complexity. The creation of an external user can be performed from the '''Third party''' module. The users need to choose the '''contact''' option. The option of '''create user''' will be visible underneath the contact card. The users then need to click on the option for creating the concerned person an external user. Hence, it is important to create a contact before creating an external user. However, there will not be any '''create user''' option if the contact is already listen as an external users. | Creation of an external user is a little bit different from creating of an internal user. However, the users can create external users account without having to face much complexity. The creation of an external user can be performed from the '''Third party''' module. The users need to choose the '''contact''' option. The option of '''create user''' will be visible underneath the contact card. The users then need to click on the option for creating the concerned person an external user. Hence, it is important to create a contact before creating an external user. However, there will not be any '''create user''' option if the contact is already listen as an external users. | ||
[[File:External_user_1.PNG|center|link=]] | |||
[[File:External_user_2.PNG|center|link=]] | |||
[[File:External_user_3.PNG|center|link=]] | |||
[[File:External_user_4.PNG|center|link=]] | |||
== Creating a user from a third-party == | |||
The creation of user can be completed through the member module as well. However, you need to make sure that the member is linked to a third party. Making a user from a member requires the completion of a few steps. The steps are member menu -> list -> choose the concerned member -> Click on create a user -> a confirmation box will open at the top of the page -> Choose external/internal as per your requirements -> validate. After your validation is completed, the user will be created. | |||
== Public Virtual Cards == | |||
Public Virtual Card is now available in Tactic. All you need to do is to access the home page of your Tactic interface and click on the profile icon that sits at the top left corner of the page. When you click on it, the details of your profile will open in a drop down. | |||
[[File:PVC-1.PNG|center|link=]] | |||
At the footer of the drop-down you will find three options. Click on the middle option that shows an icon of a business card. Once you click on it, Tactic will show a pop-up asking you to enable virtual business card – turn on that option. Once you are done turning that on, you will find an external link on the same page. Click on the link, it will redirect you to the virtual business card page. | |||
[[File:PVC-2.PNG|center|link=]] | |||
You can scan the QR code and open the card or you can also download the VCF by clicking on the download button presented at the end of the page. | |||
[[File:PVC-3.PNG|center|link=]] | |||
= Defining permissions = | = Defining permissions = | ||
Defining permission is one of the primary factor that need to be performed with the assistance if the '''User''' module. The permission can be defined by going to the '''Permission''' option from '''user''' module. | Defining permission is one of the primary factor that need to be performed with the assistance if the '''User''' module. The permission can be defined by going to the '''Permission''' option from '''user''' module. | ||
= Exporting user related security events = | |||
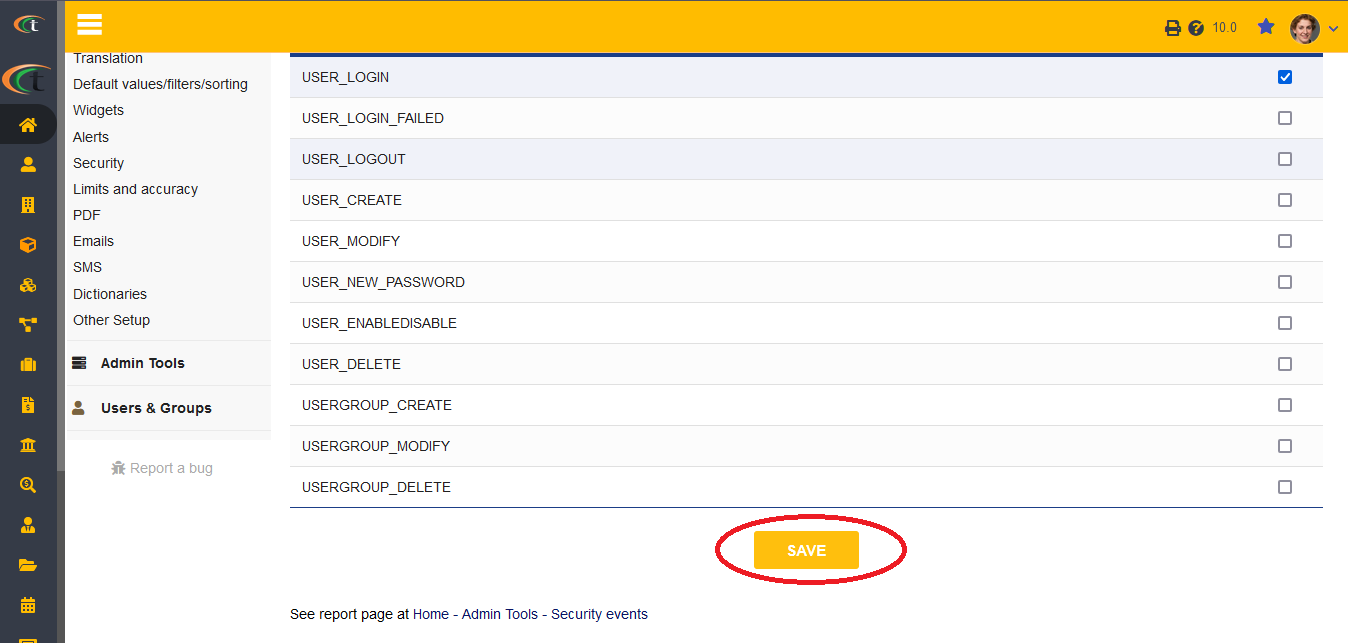
Tactic has taken security to a new level. Now you can keep a log of your users’ log-in activity in the form of security events. This can be achieved by following two stages. In the first stage, you need to configure the security events settings. The steps are mentioned below, | |||
Home -> Setup -> Security -> go to security events tab -> choose the events you would like to keep a track of -> click on save. Once you are done saving the settings you can proceed with the next stage. | |||
[[File:Security-events-1.PNG|center|link=]] | |||
[[File:Security-events-2.PNG|center|link=]] | |||
[[File:Security-events-3.PNG|center|link=]] | |||
[[File:Security-events-4.PNG|center|link=]] | |||
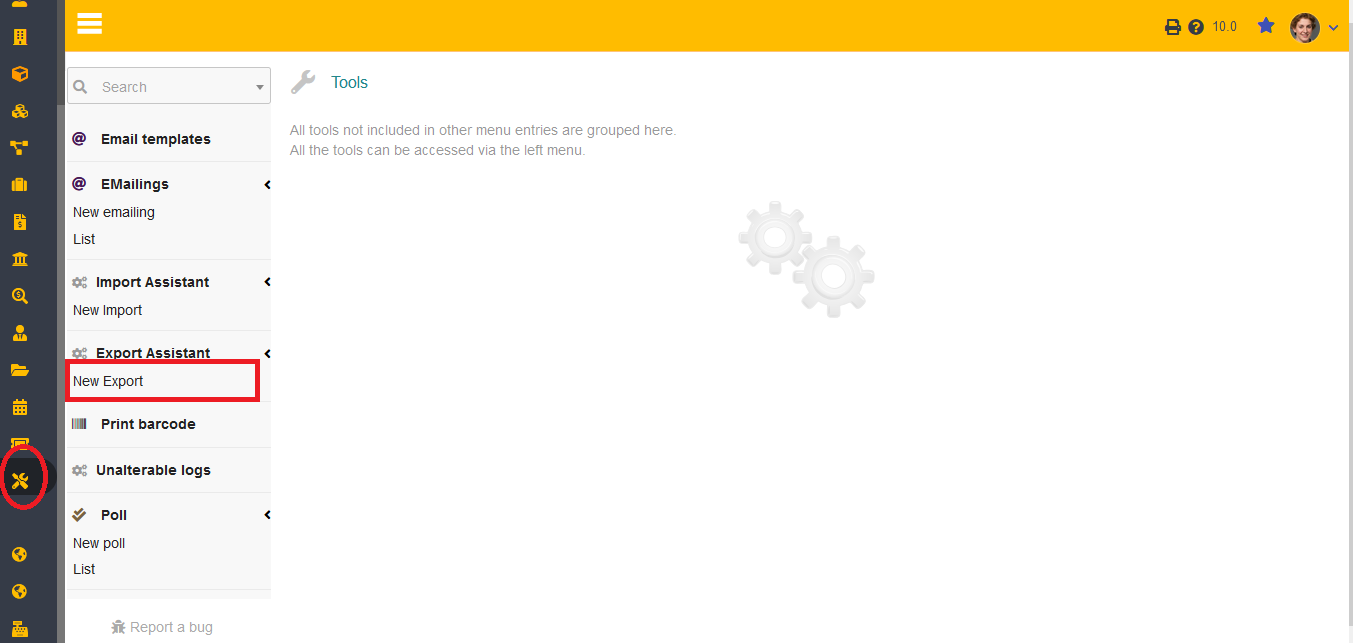
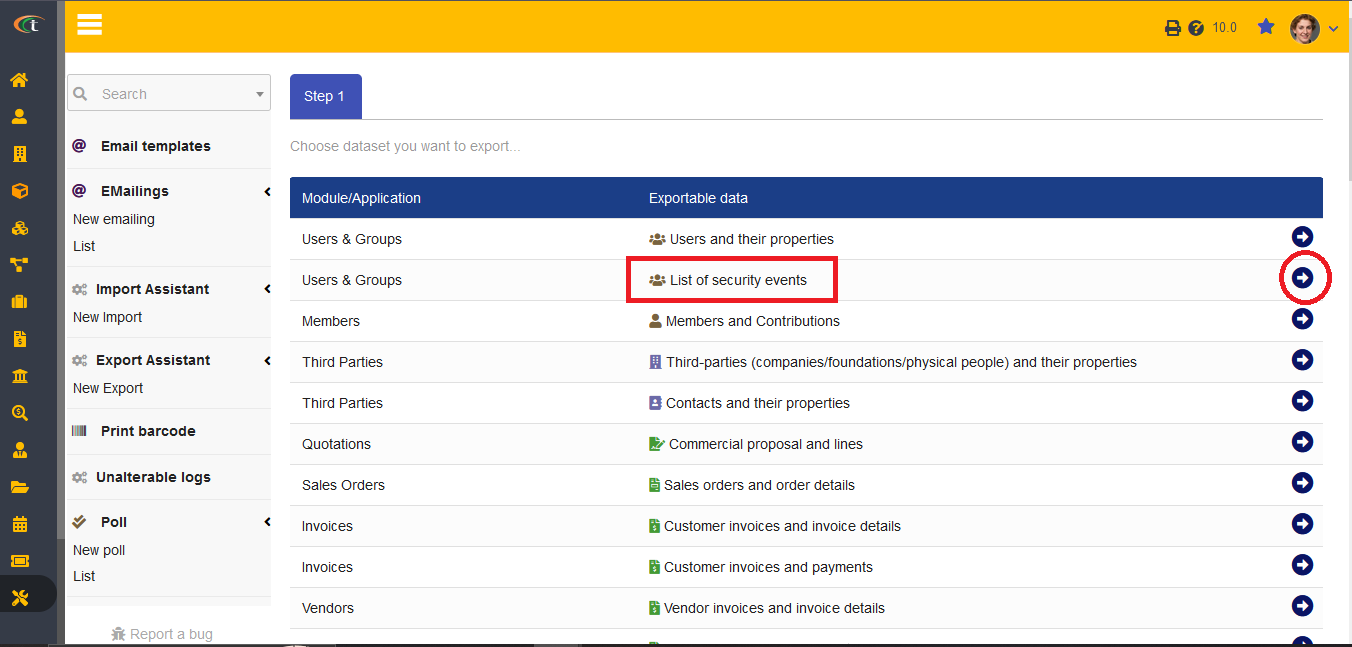
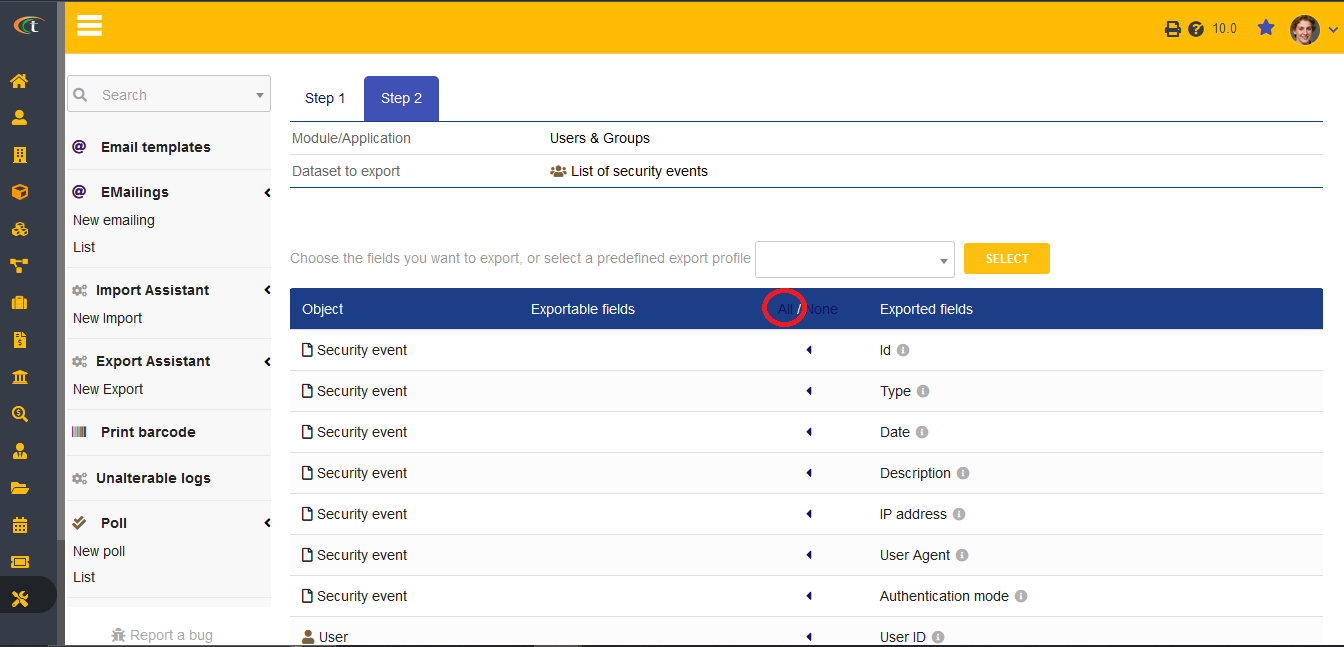
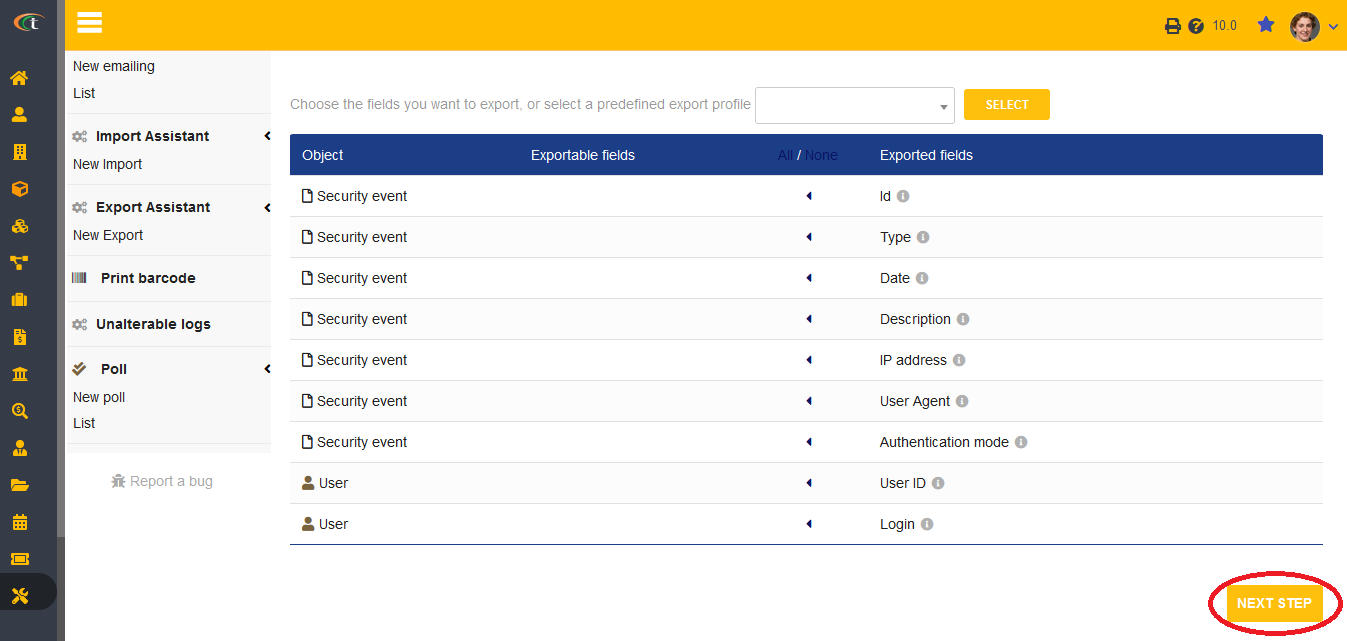
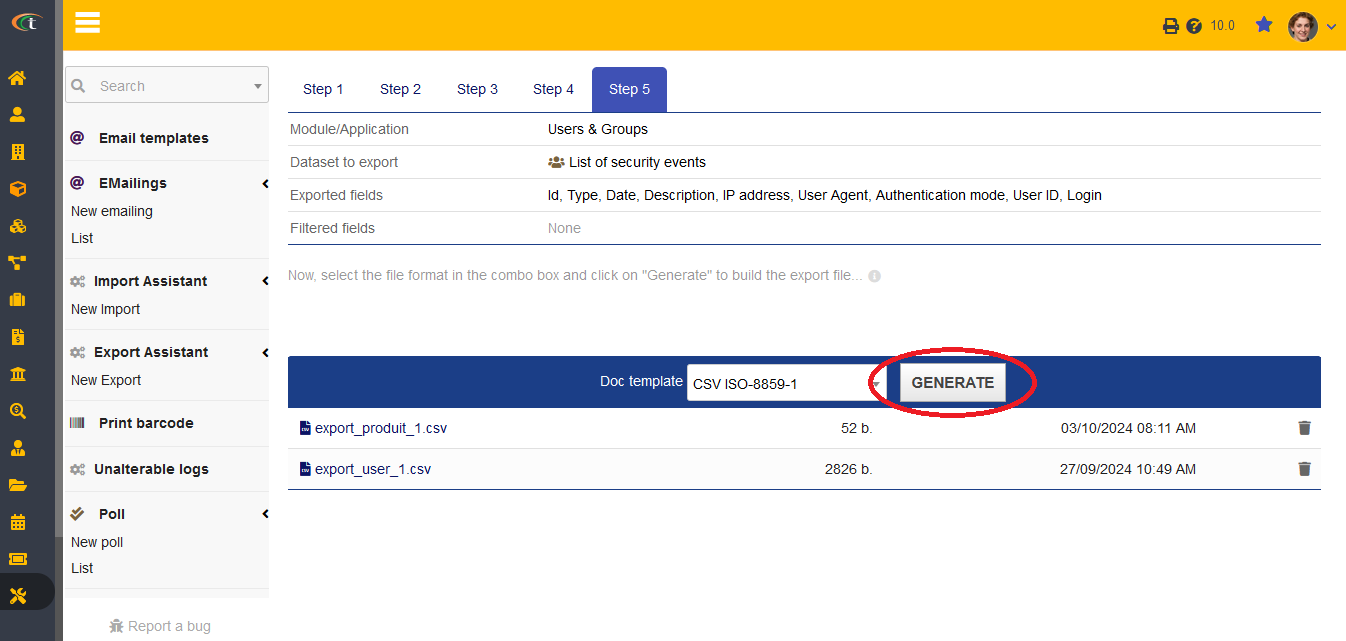
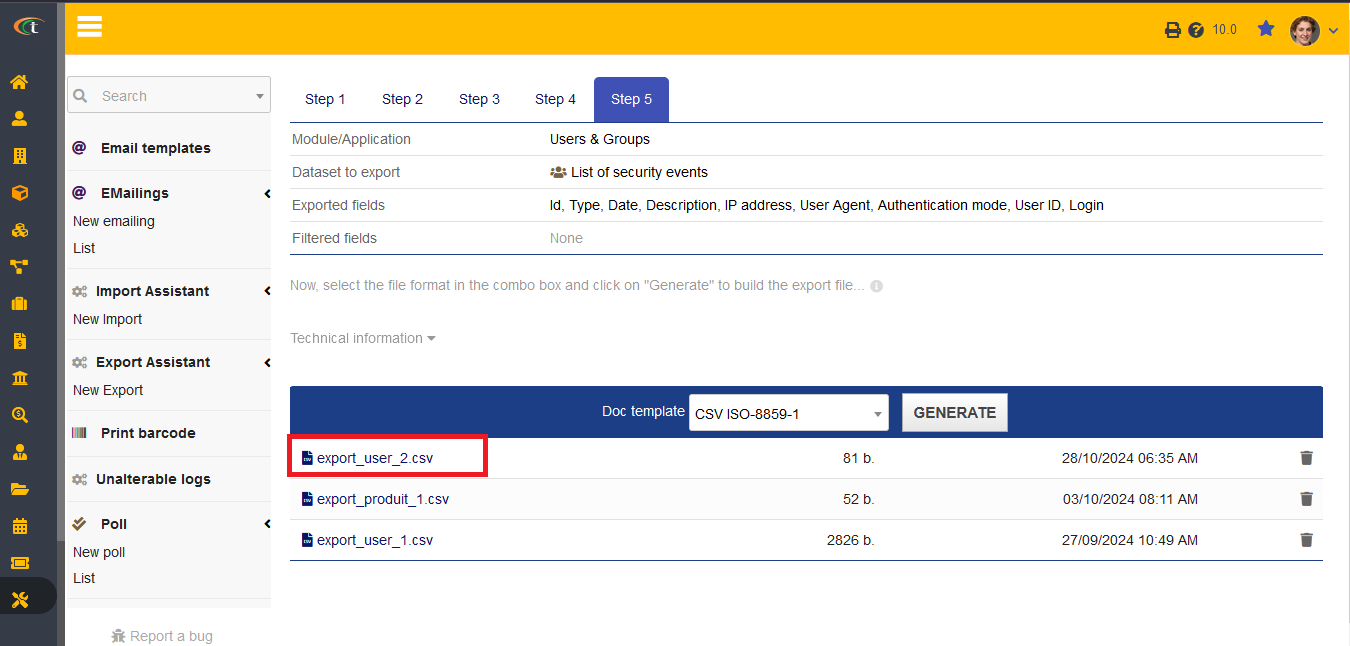
Now you need to start with the exporting task, for which you need to go to home -> Tools menu from the main menu bar -> new export -> choose the second option (List of security events) -> click on the arrow -> select the fields -> click on next step -> put on value if needed -> click on next step -> sort out the positions if needed -> choose the document format -> generate -> click on the file name to download it. The list will be downloaded in no time. | |||
[[File:Security-events-5.PNG|center|link=]] | |||
[[File:Security-events-6.PNG|center|link=]] | |||
[[File:Security-events-7.PNG|center|link=]] | |||
[[File:Security-events-8.PNG|center|link=]] | |||
[[File:Security-events-9.PNG|center|link=]] | |||
[[File:Security-events-10.PNG|center|link=]] | |||
Latest revision as of 08:48, 28 October 2024
Introduction
In the course of an ERP & CRM software there need to be a group of people or an individual, who manages the access and directs the entire software as per the organisational need. The people who are the one to manage the access are called “User”. The users play a very vital role in the management of data in the ERP & CRM software, as they decides the limitation of access and permission for other users or members of the organisation. Hence, it can be stated that the user module is the most important and a mandatory part of the ERP & CRM systems. Tactic has followed that path as well and enhanced the user module with advanced efficiency for increasing positive impact on the customers. User module is considered to be the most important module to exist in Tactic. This module cannot be disabled as it defines the primary working structure of Tactic. The goal of this module is to manage users, groups and their permissions.
Installation
There is no need of installing this module, as it is already included within Tactic services.
Setup
For using this module the users need to enable it by using an administrator account. The menu options for activating this module are: Home –> Setup – > Module. The users then need to click on Activate. The modules will be activated after completing this step. The settings icon will be visible at the end of the module box, the users can click in that to access further setup for this module for accessing the functionalities in a better way.
Life cycle of user module
There can be two types of users, the internal users and the external users. The internal users are the people who are a core part of a company or an organisation. The external users can be third parties as well. In some cases the customers and stakeholders can be users, which are termed as the external users.
Creation of a new user
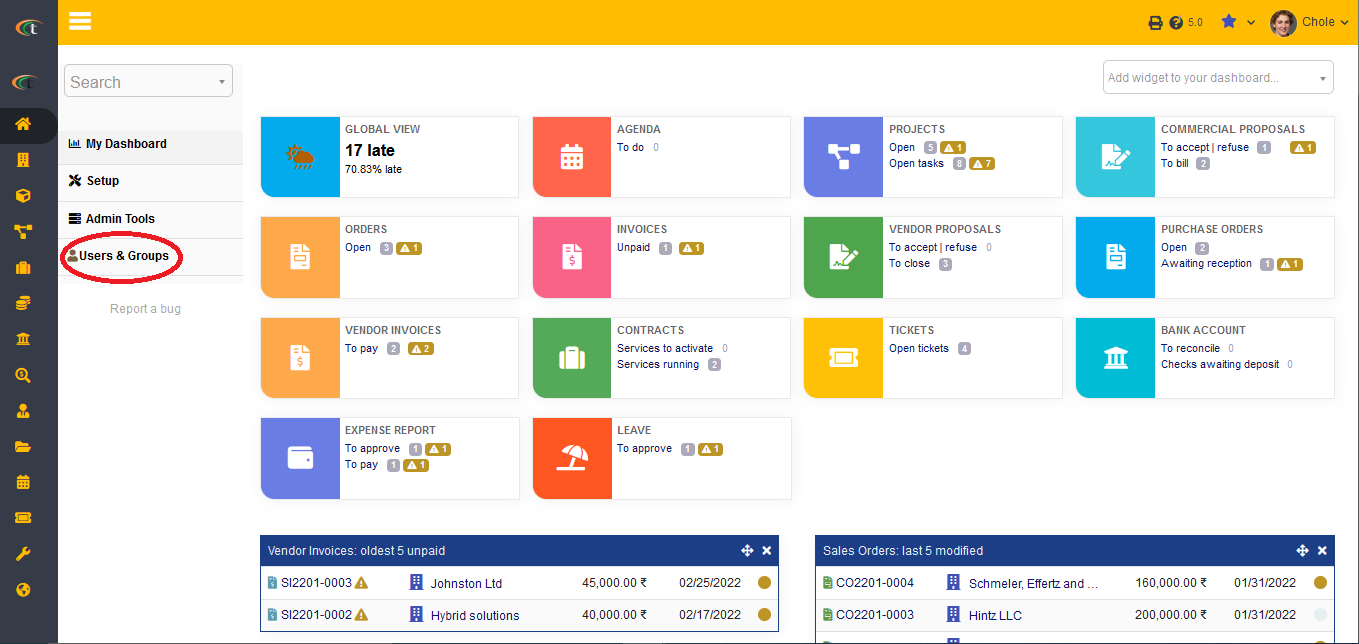
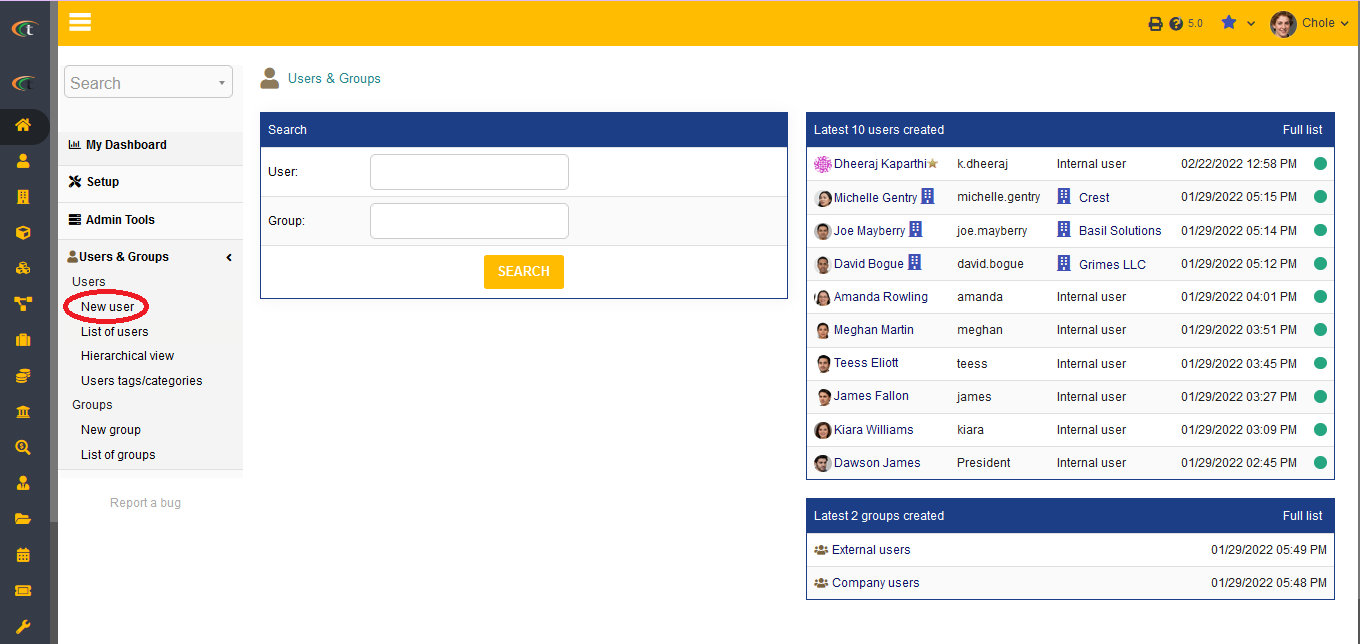
Users can be created directly from the users and groups module. For creating a user, it is important to visit Home menu. The option of users & groups need to be chosen, after that the option of New User need to be chosen for creating a new user.
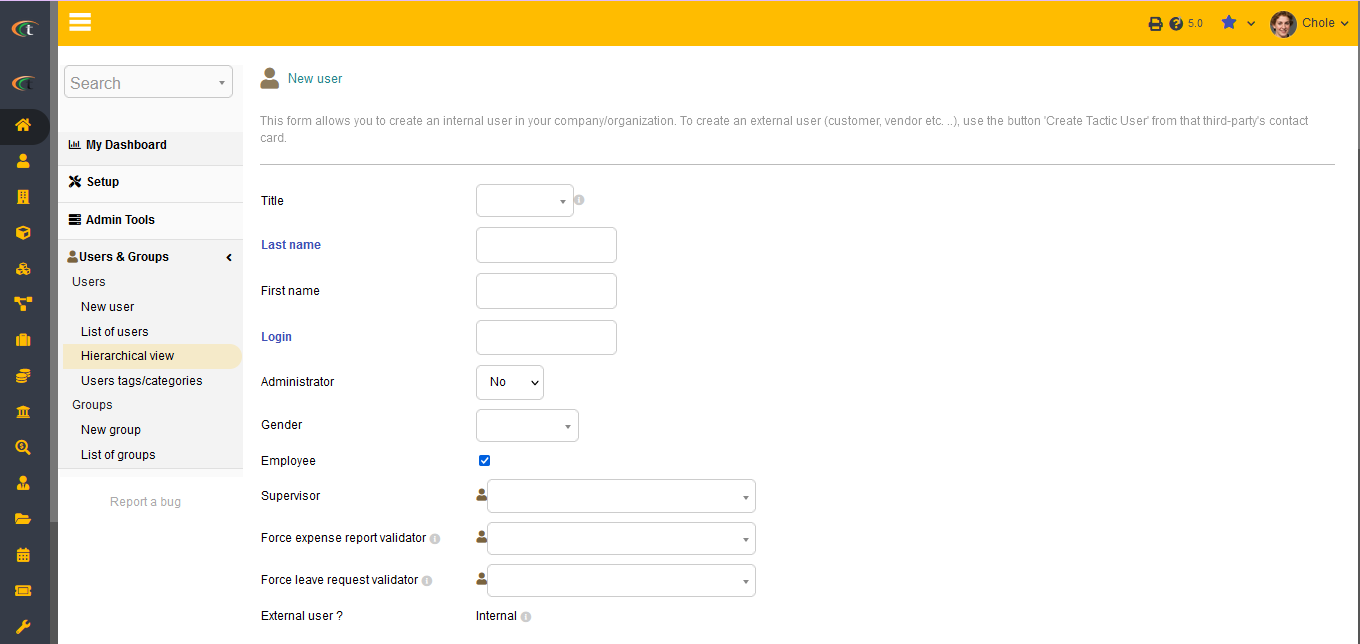
Adding the date of birth of user can be done while creating a new user by filling the right criteria. It can also be achieved by modifying a user by clicking on the “modify” option after opening a user card. And then clicking on save.
Just like the birthdays of the users, you can now add their employment anniversary too. For adding employment anniversary of the users, you need to open their user card first by following the steps of home -> users and groups -> user list -> choose the user you want to work with -> click on modify button once the user card opens -> scroll towards the end of the page -> put on employment date in the ‘Employment’ box -> click on save.
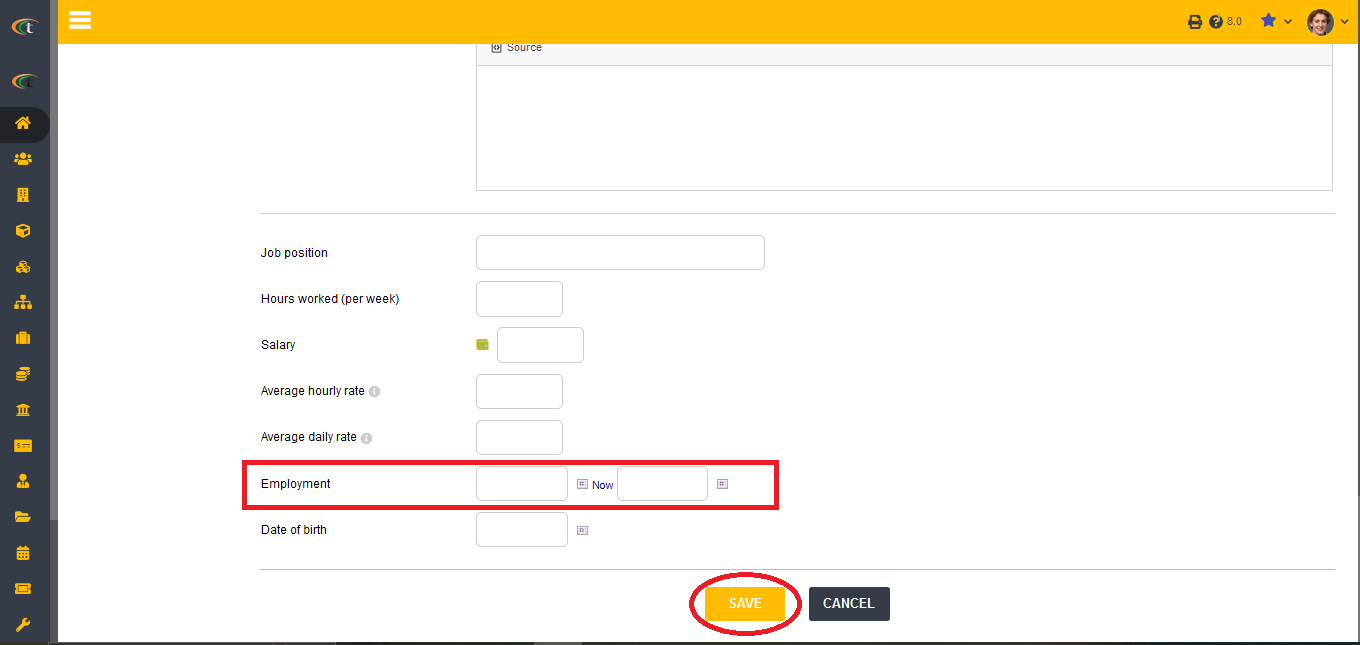
The user’s employment anniversary will be saved to Tactic now.
Creation of an external user
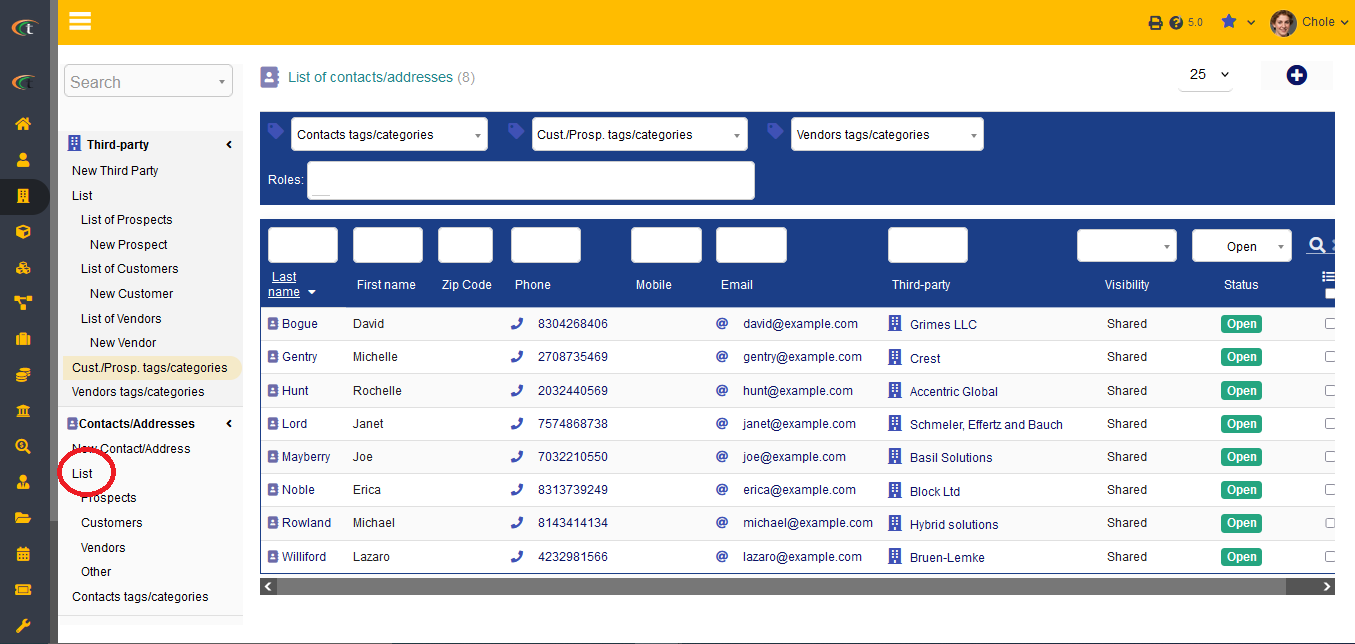
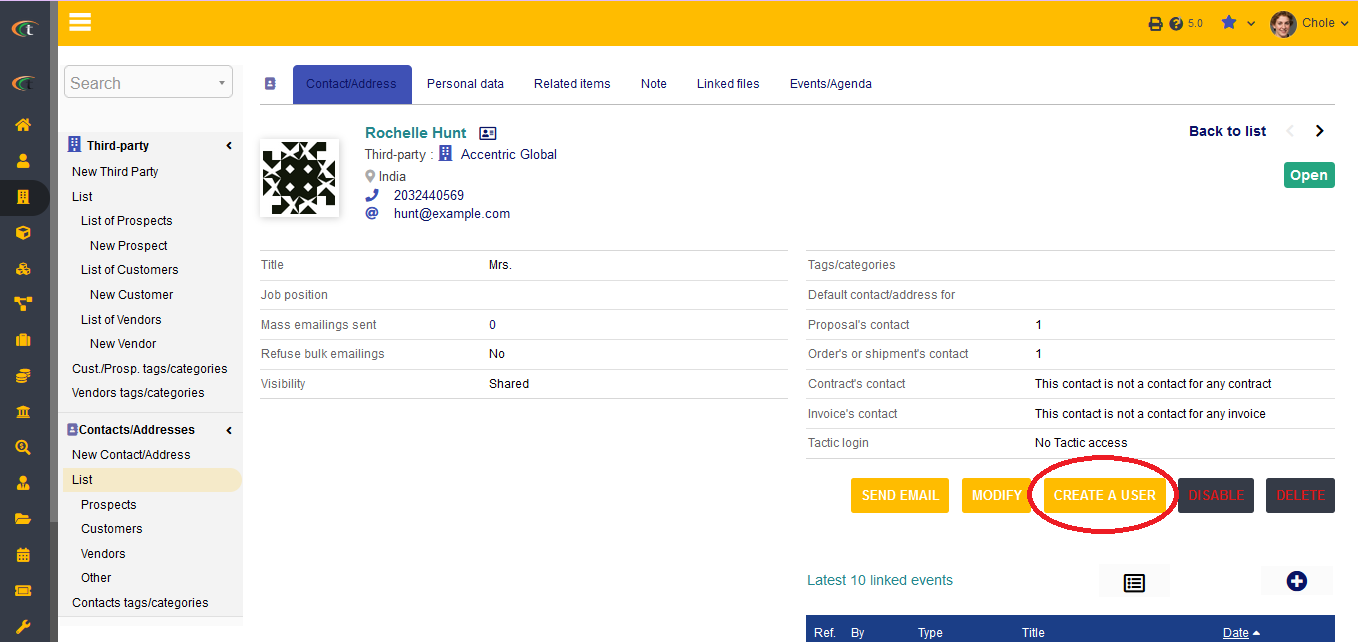
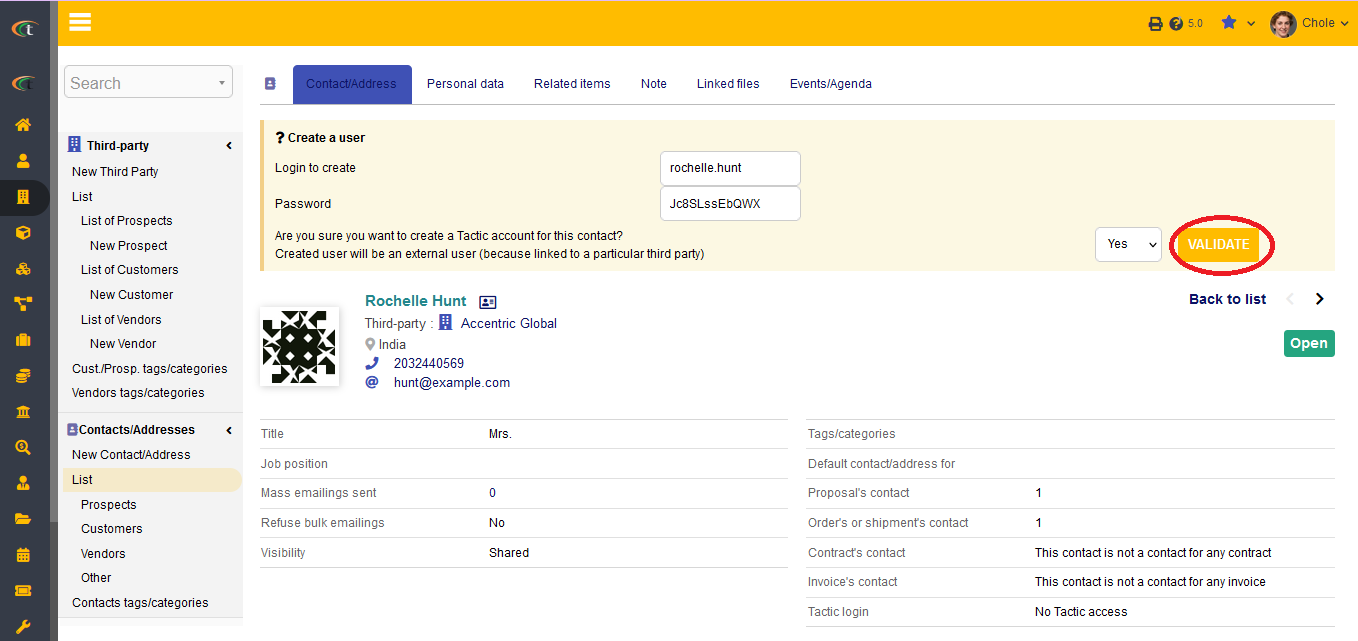
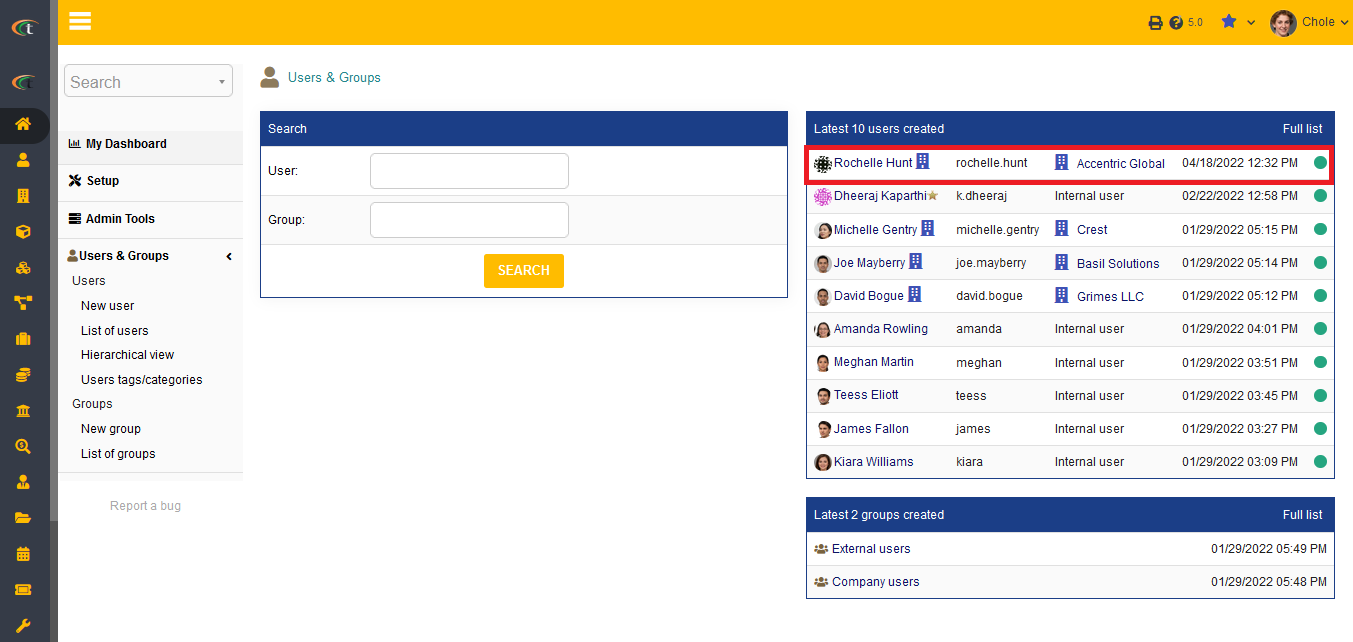
Creation of an external user is a little bit different from creating of an internal user. However, the users can create external users account without having to face much complexity. The creation of an external user can be performed from the Third party module. The users need to choose the contact option. The option of create user will be visible underneath the contact card. The users then need to click on the option for creating the concerned person an external user. Hence, it is important to create a contact before creating an external user. However, there will not be any create user option if the contact is already listen as an external users.
Creating a user from a third-party
The creation of user can be completed through the member module as well. However, you need to make sure that the member is linked to a third party. Making a user from a member requires the completion of a few steps. The steps are member menu -> list -> choose the concerned member -> Click on create a user -> a confirmation box will open at the top of the page -> Choose external/internal as per your requirements -> validate. After your validation is completed, the user will be created.
Public Virtual Cards
Public Virtual Card is now available in Tactic. All you need to do is to access the home page of your Tactic interface and click on the profile icon that sits at the top left corner of the page. When you click on it, the details of your profile will open in a drop down.
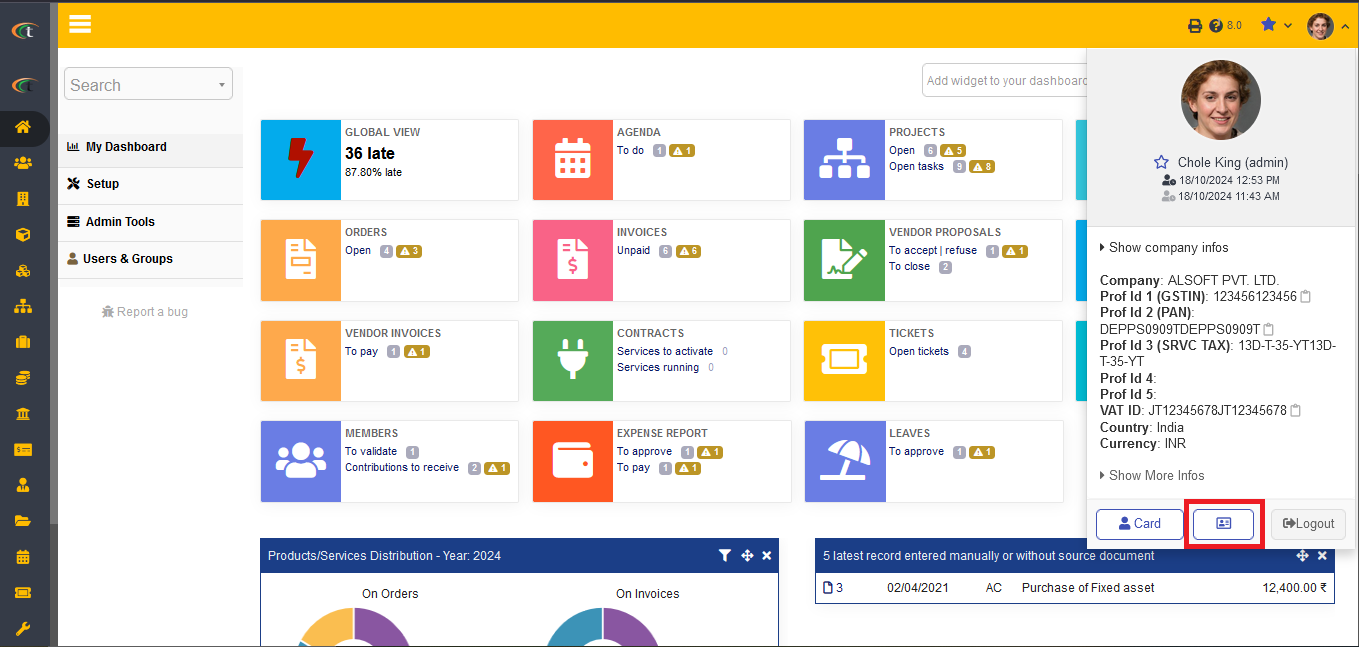
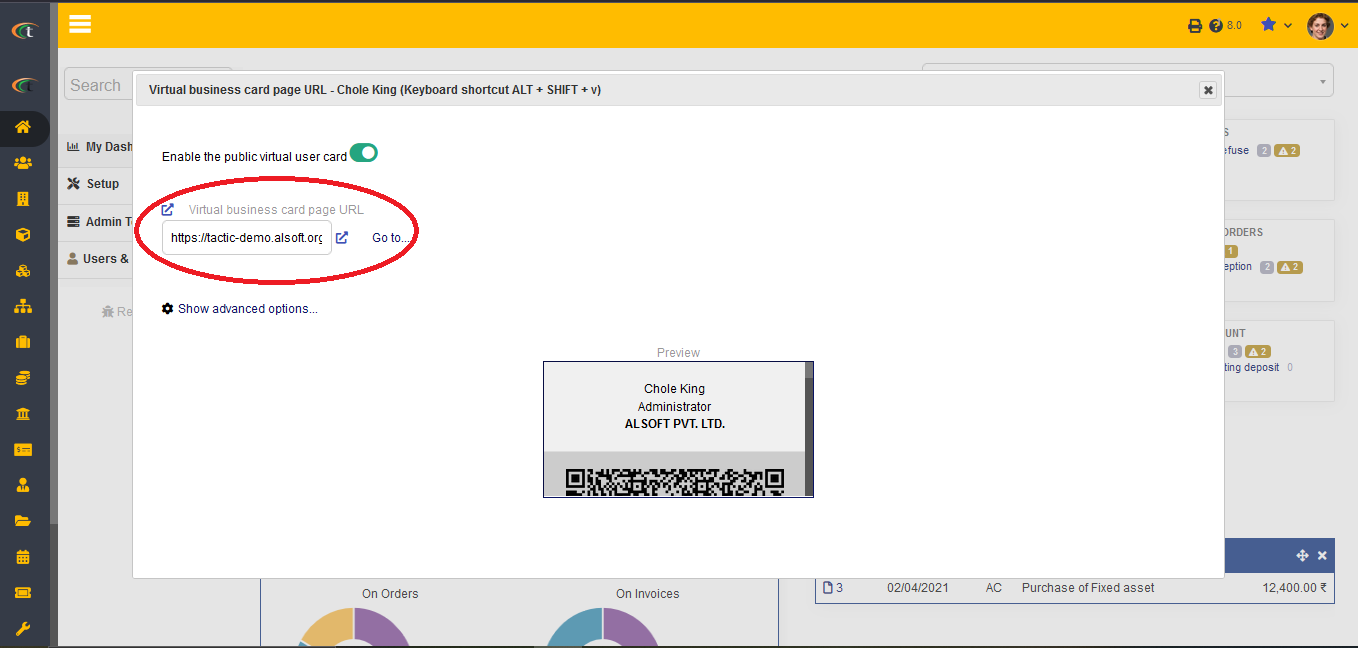
At the footer of the drop-down you will find three options. Click on the middle option that shows an icon of a business card. Once you click on it, Tactic will show a pop-up asking you to enable virtual business card – turn on that option. Once you are done turning that on, you will find an external link on the same page. Click on the link, it will redirect you to the virtual business card page.
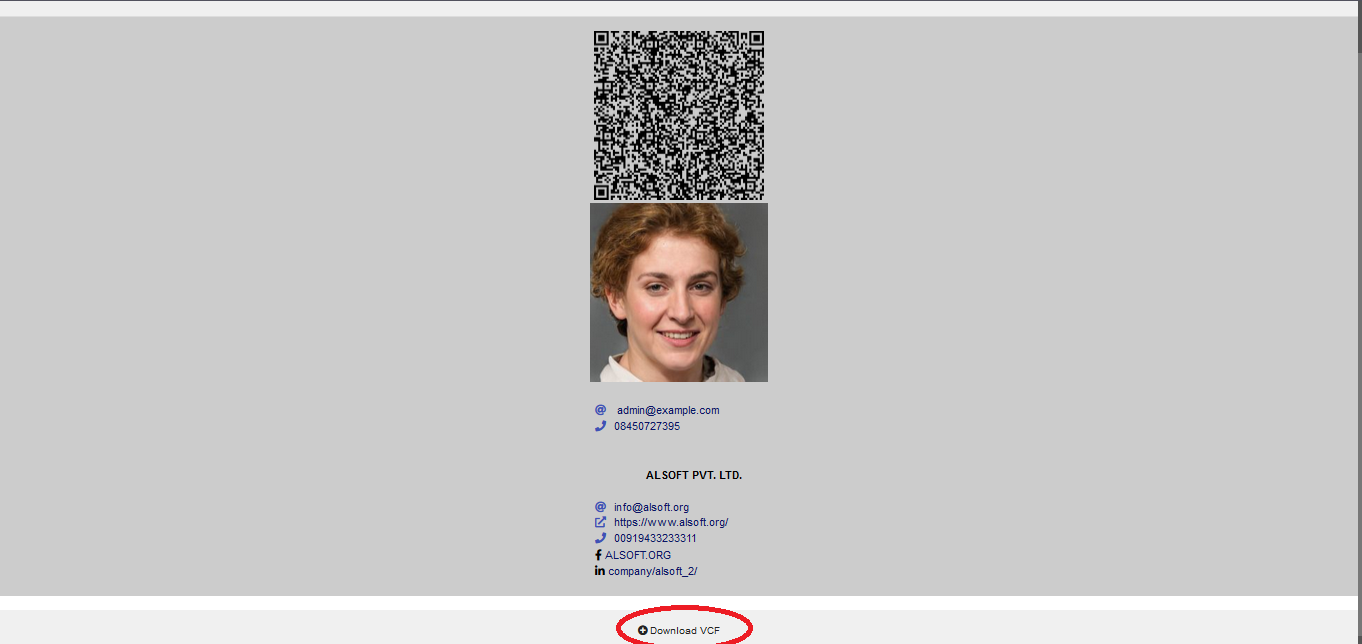
You can scan the QR code and open the card or you can also download the VCF by clicking on the download button presented at the end of the page.
Defining permissions
Defining permission is one of the primary factor that need to be performed with the assistance if the User module. The permission can be defined by going to the Permission option from user module.
Tactic has taken security to a new level. Now you can keep a log of your users’ log-in activity in the form of security events. This can be achieved by following two stages. In the first stage, you need to configure the security events settings. The steps are mentioned below,
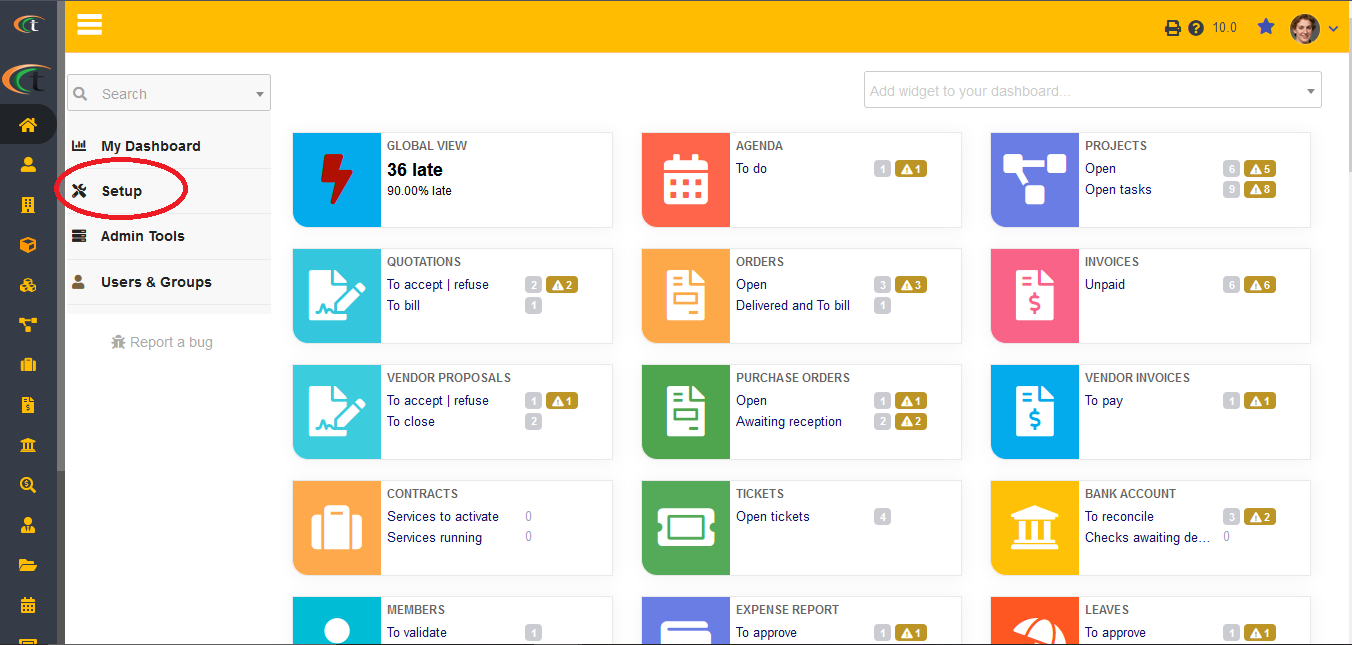
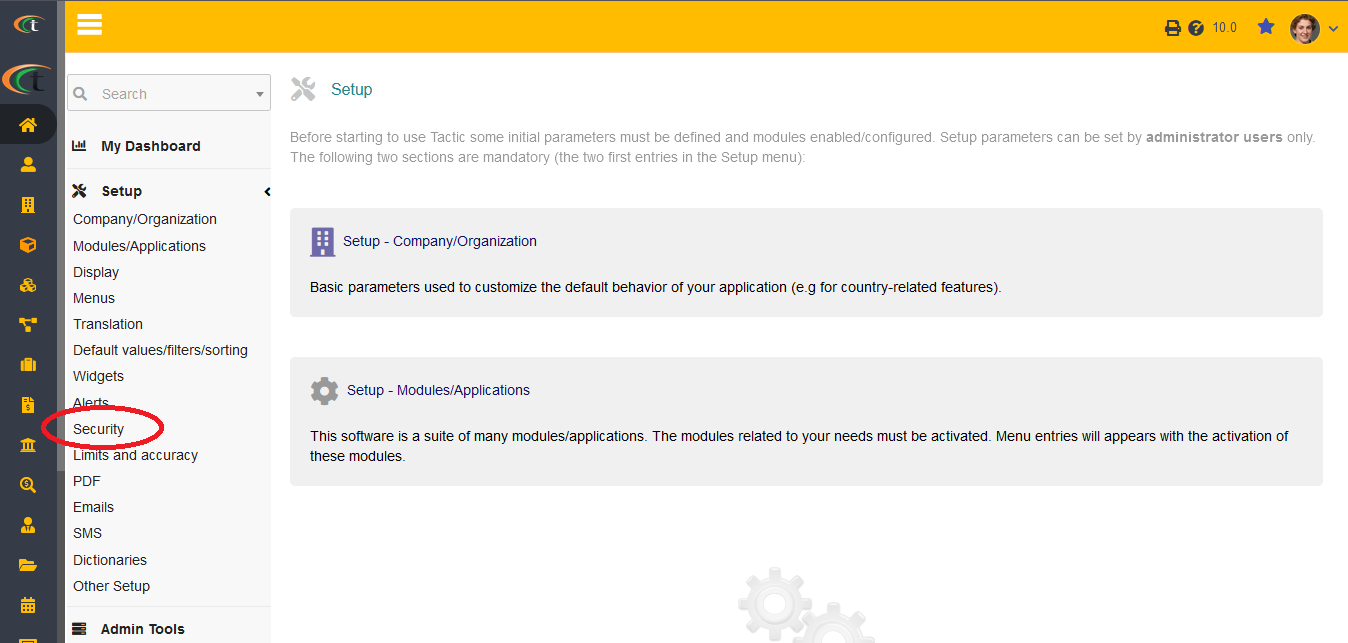
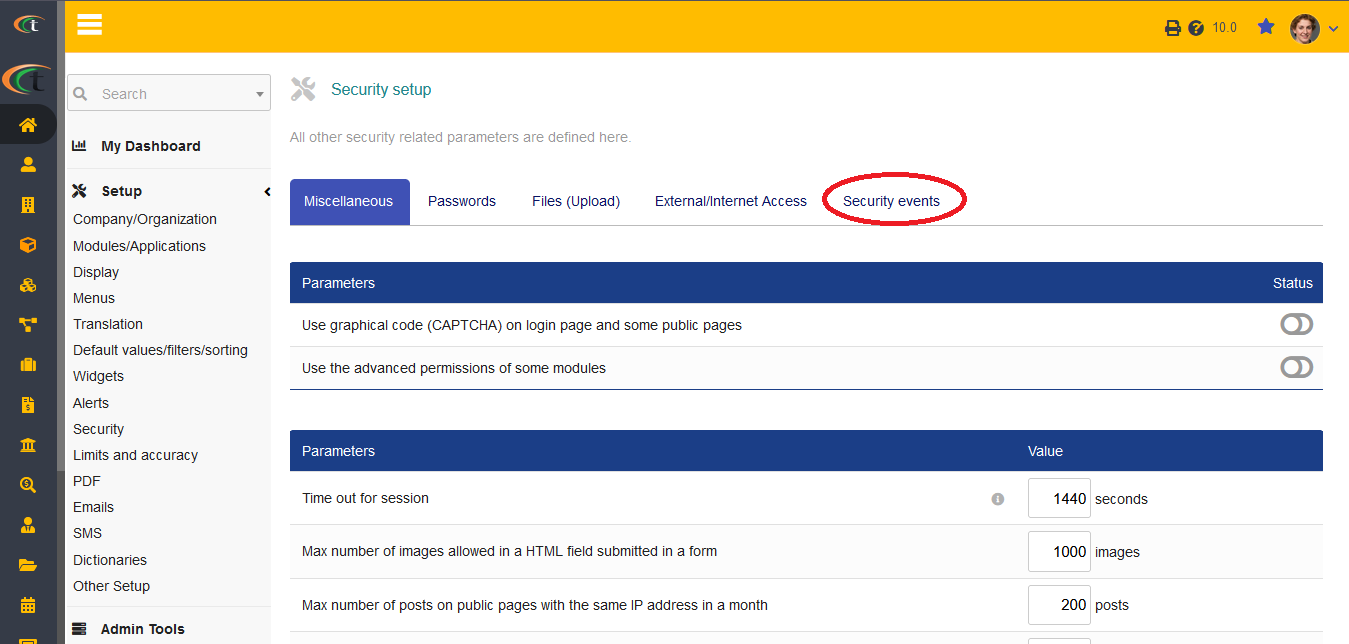
Home -> Setup -> Security -> go to security events tab -> choose the events you would like to keep a track of -> click on save. Once you are done saving the settings you can proceed with the next stage.
Now you need to start with the exporting task, for which you need to go to home -> Tools menu from the main menu bar -> new export -> choose the second option (List of security events) -> click on the arrow -> select the fields -> click on next step -> put on value if needed -> click on next step -> sort out the positions if needed -> choose the document format -> generate -> click on the file name to download it. The list will be downloaded in no time.
