How to implement day to day accounting in Tactic
Introduction
In this section we will help you in learning how to implement day-to-day accounting in Tactic. Understanding the concept of accounting with an ERP system and implementing that successfully can be quite tough. This is why we have prepared this tutorial to help you out in a very methodological manner.
Step-by-step process
Before starting off with Tactic’s Accounting Module, we need to set up the company/organization details followed by the correlated modules used in Accounting such as Third Parties, Products, Bank Accounts, etc. The Admin is also required to allow the user (who will be responsible for the accounting part of the company) the permissions required to operate within the Accounting module.
- Step 1: Click on “Home” -> “Setup” -> “Company/Organization”. A page will appear where you have to fill out the entire company’s details.
- Step 2: Then you have to click on “Modules/Applications” under “Setup” and enable all the related modules which you are going to require in your financial reporting.
- Step 3: After these two requirements are fulfilled, now the admin must create a user/accountant (person who is in charge of the accounting and reporting in the company) and assign them the permissions which will result in hindrance-free accounting.
- Step 4: So, any company that maintains its account books and deals with accounting, they are bound to generate sales and purchases. Therefore, one must create Third-parties, products, Bank accounts with appropriate details, customer and vendor invoices, etc.
Now we will learn one by one how to create the above-mentioned items.
- Step 5: First of all, after you have activated the Third-party module, you will witness that in the left-hand side bar. Click on “Third-Party”, and for reference-
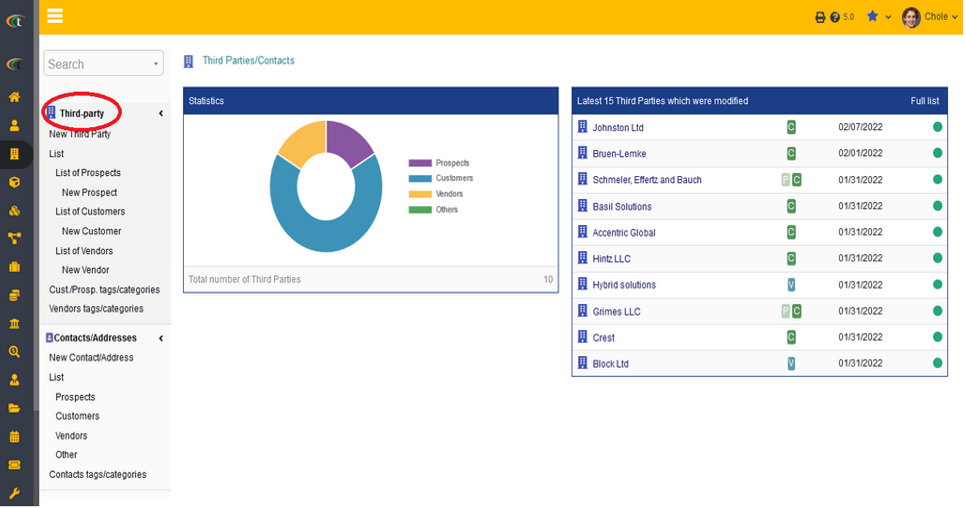
Now, click on “New Third-Party”, and provide all the necessary information, then click on “Create Third-Party”. Your Third party is created, whether it’s a customer/ vendor/ prospect.
- Step 6: Being a business, one company is ought to sell and purchase certain products and services. Therefore, you need to create a suitable product and for that click on the “Products” Module.
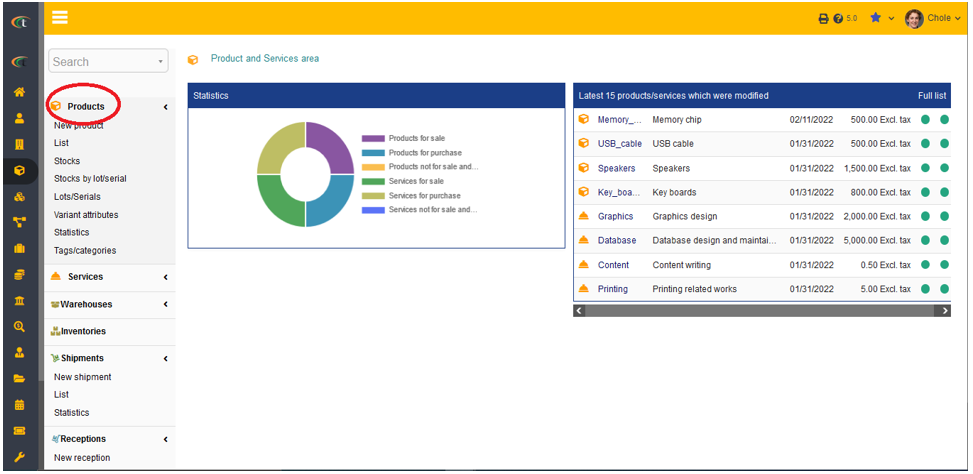
Click on “New Product” and add all the required details of the specific product and click on “Create”.
- Step 7: Every business must have a separate business Bank Account to keep business and personal finances separate. Therefore, we need to create a Bank Account. Click on “Bank Module” as shown below.
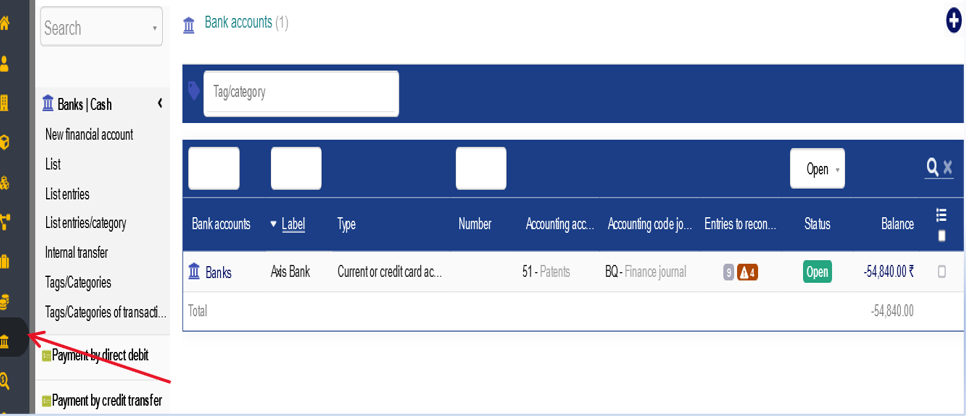
Now, under Banks /Cash menu, you will see “New financial account”, click on that. After that, the page which appears will ask you to provide the bank details. Fill in all the necessary details and then click on “Create Account”.
- Step 8: Goods and Services produced or manufactured by business enterprises must be sold. Sales of goods and services are thus necessary for the very existence of business and growth over time. Therefore, customer invoices are to be generated within the ERP System. We will see how?
Go to the Activated Module “Billings/Payments” and then click on “New Invoice” under Customer Invoices” just like shown in the picture below.
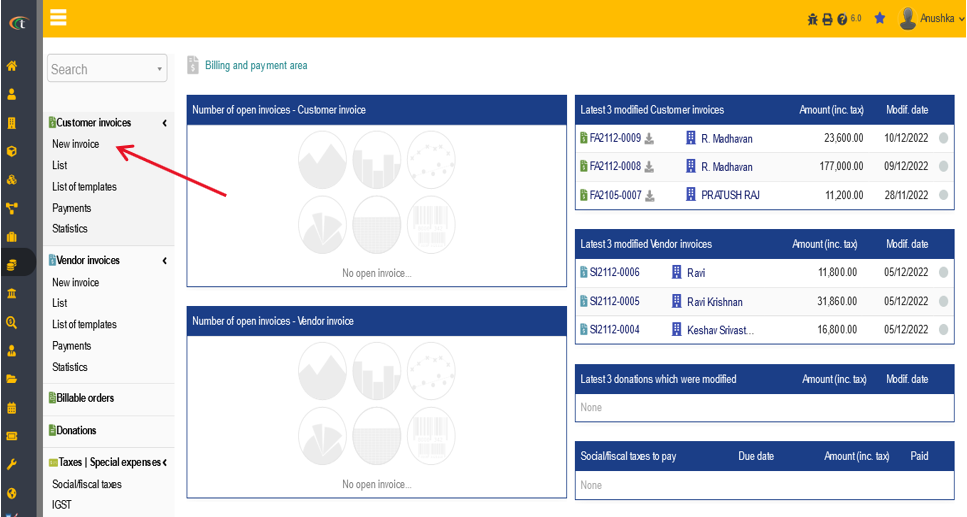
There pops up a page where you have to create a New Invoice. Thus, specify the details of the transactions such as the name of the Third-Party, type of Invoice, invoice date, payment terms, and method etc., and then click on “Create Draft”. After that, you will see the page something like this-
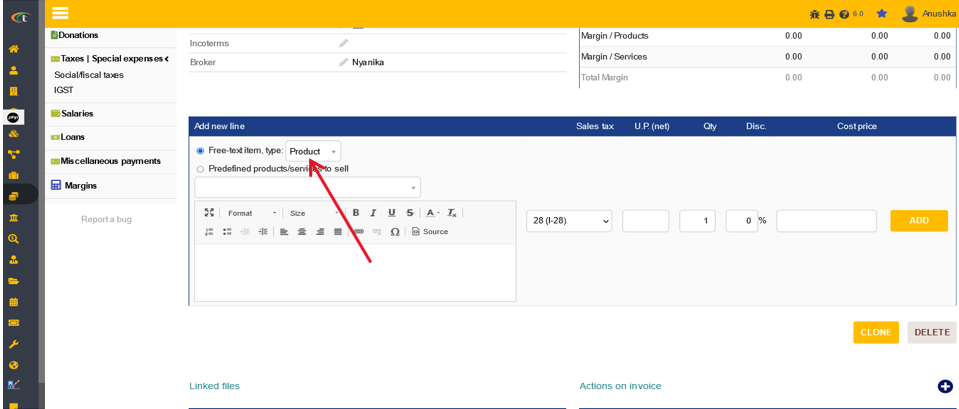
As you see, you are required to add the product and service sold and specify the tax rate, price excluding tax, quantity, and discount if provided, and then click on “Add”.
After you have added the product or service, you need to validate this transaction. For that click on “Validate”. Now for the sake of understanding how Accounting works, suppose the customer paid you for your service provided or product sold, therefore, you have to click on “Enter Payment”.
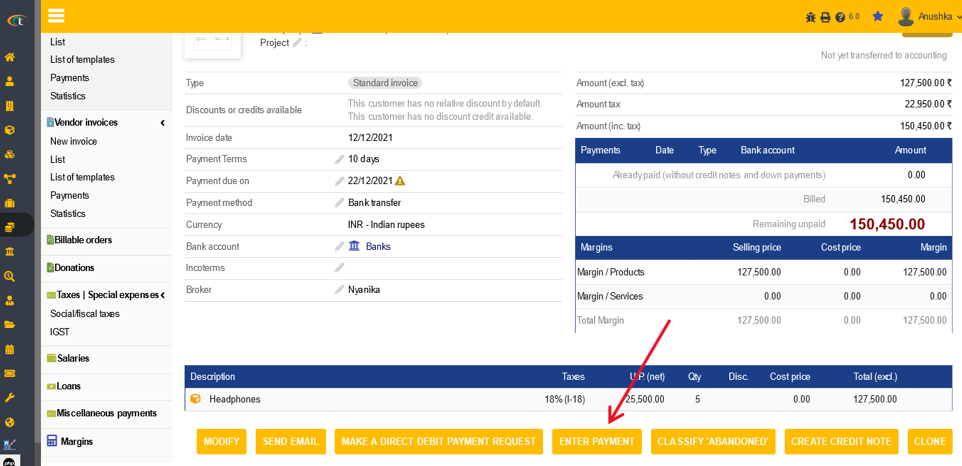
The next page which appears will ask you to enter payment received from the customer. Provide the information, accordingly, enter the payment amount at last and then click on “Pay”. Then again it will ask you to Validate the payment.

Now again click on “Validate” to complete the transaction.
The same goes with Purchases, where you have to prepare “Vendor Invoice” and same procedure follows.
Now as we are geared up with all the necessary elements required for Accounting, the time has arrived when we enter “Accounting Module”. Accounting is of two types- Single Entry Accounting System and Double Entering Accounting System. In today’s modern world, enterprises wish to have a thorough knowledge of their Business Assets, Liabilities, and the Owner’s Equity, and all these cannot be provided by Single Entry Accounting, as it records a transaction with a single entry and only maintains one side of every transaction. It basically involves cash receipts and cash disbursements rather than giving any knowledge regarding assets and liabilities.
Whereas, Double Entry Accounting System works on Modern Accounting Rules that state every financial transaction has equal and opposite effects in atleast two different accounts. In this, transactions are recorded in terms of debits and credits, where debit in one account offsets the credit in another account, thus implying sums of all debits must equal the sums of all credits. It also satisfies the Accounting Equation- Assets = Liabilities + Equity.
Therefore, in Tactic’s Accounting Module, we will preferably look out for Double Entry Accounting System. We will come to know step-by-step.
- Step 1: Click on Accounting Module where you will see the “Set up” Menu. Click on that. The first option that you will see is “General”. So, before starting off with any module, there are certain general configurations needed to be done. This “General” configuration will provide you with Binding Options and a few general options.
- Step 2: Below “General”, you will see “Accounting Period”, here you have to add the financial period in which you are operating. It can be either a Calender or a Financial year.
- Step 3: After that, the option comes “Accounting Journals”. Here you will find the list of journals of different categories like Sales Journal, Purchase Journal, Expense Report Journal, etc. The user is free to add/modify their own choice of journals .
- Step 4: Then comes “Chart of Accounts” Section.
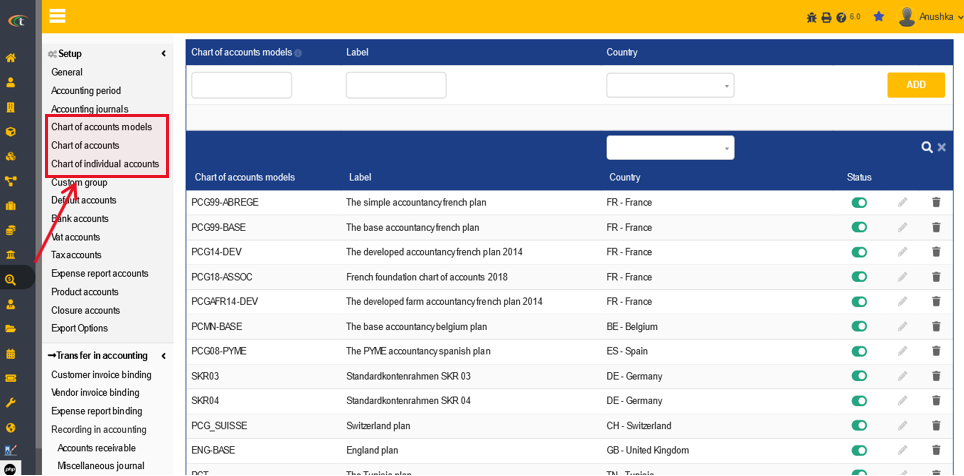
As you can see the picture above, this particular section deals with “Chart of Accounts”, where you can add the accounting plan based on their usage and importance in different nations, then you can add the accounting accounts by yourself, and in the third option, every third party you create whether it is customer, prospect, vendor, or any user, they will appear under “Chart of Individual Accounts”, all you need is to assign them an accounting code to find them in this list.
- Step 5: “Default Accounts” helps you to set/assign Default Accounts to link transaction records about payments, salaries, donations, taxes, Vat, when no specific accounting account was already set.
For understanding how accounting works, one must learn that it is a step-by-step procedure, where first is the recording of transactions in Journal, then posting those passed and recorded entries from Journal to General Ledger, then matching the debit and credit balance in Trial Balance (Account Balance in Tactic), and after doing all the adjustment entries finally comes the Reporting part.
Journal: It is just a place of records of financial transactions that are recorded/chronicled in chronological order (by date). Thus, in “Tactic”, we will learn how Journal Entries are passed.
Click on “Journals” under Accounting. Then in the extreme top right corner, you will see a “Add” symbol something like this.

After you click on that, a page appears that says “Create new transaction”. Fill in the date on which transaction took place, then determine the nature of the transaction and then place it under the appropriate Accounting Journal category, then click on “Create”.
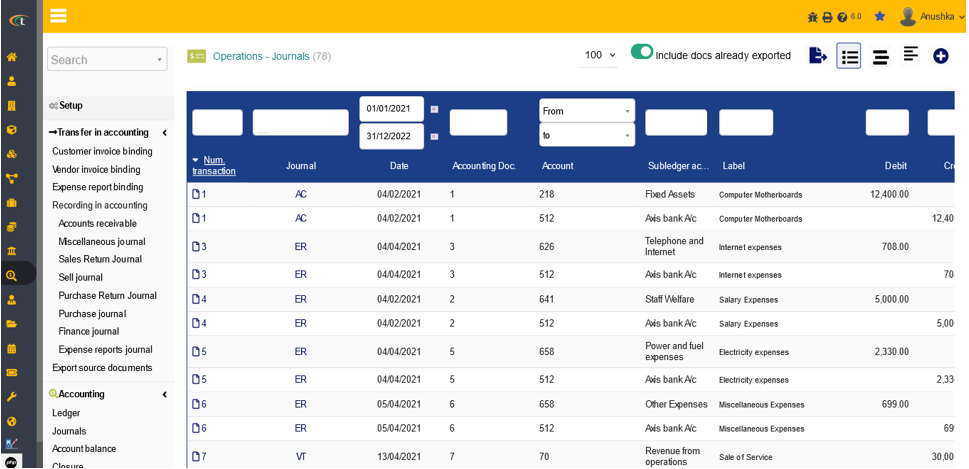
Next thing you have to pass the journal entry appropriately and validate the transaction. After all, the journal entries have been passed, you can see the list of them just like this-
Ledger:
Moving forward, the second comes the Ledger. Ledger is nothing but a book that contains different accounts where records of transactions pertaining to a specific nature are stored.
In Computerized Accounting Systems, like “Tactic”, you just need to pass journal entries applicably, and after that everything gets recorded automatically. Therefore, in Ledger, you have got nothing to do if the transactions are recorded correctly under appropriate accounting account, the ledger will show you the balance suitably. After passing all the journal entries, posting takes place in General Ledger, and it will be visible to you in the following manner-
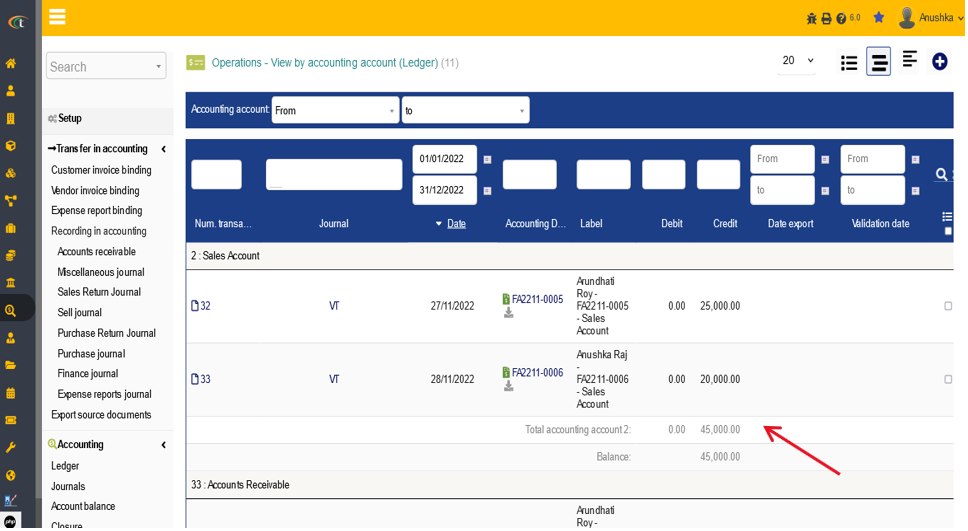
At the end you are able to see the Total Accounting Account Balance of that particular Ledger as you can see in the picture above.
Account Balance: Then comes the Trial Balance/Account Balance, which depicts the total balance of both credit and debit side and the sole purpose of Account balance is to ensure that both debit and credit sides are equal. It certifies that company’s bookkeeping entries are mathematically correct and error-free.
Binding: Binding refers to the ability to bind invoices with an accounting account. It is done when there are multiple invoices, thus they are bound together so they can be shown in the Journals.
Let’s see how binding works with Vendor Invoice Binding example-
- Step 1: Go to Third-Party Module. Create a third party and assign an accounting code to that third party. Then go to Billings/Payments and draft a new invoice. Then add the products, quantity, tax rate etc. as mentioned above in Invoice creation. Then validate the transaction and enter the payment and validate the payment too.
- Step 2: After you have validated the transaction and payment, you have to click on “Vendor Invoice Binding” and select the accounting period you are recording transactions. The amount of the respective transaction will appear in this block under the respective month they were recorded.

Click on Bind Automatically. The lines of transactions get bound. You can also include them in the Journal as per the nature of the transaction. For that click on Purchase Journal (since it is a vendor invoice) under “Recording in Accounting”. Set the Report Period and Status of Journalization to “Not yet transferred to Accounting Journals and Ledger”.
You can see that the vendor invoices that were bound automatically above, here with this setup you will be able to check that those invoices are now ready to get recorded in Journals date-wise. All you have to just click on “Record Transactions in Accounting”.
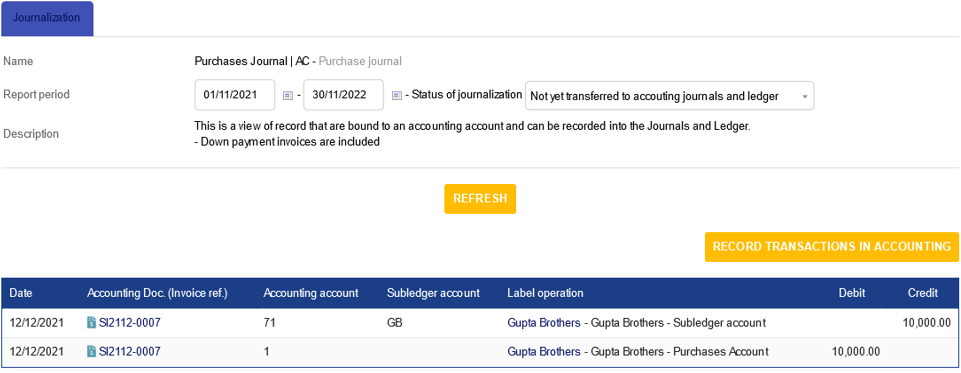
You can also cross-check the transaction whether it has been recorded in Journal or not.
Same goes for Customer Invoice Binding and Expense Report Binding as well.
Now comes the Reporting:
Reporting in “Tactic” is categorized into five parts namely-
i. Income/Expense
ii. Turnover Invoiced
iii.Turnover Collected
iv. Purchase Turnover Invoiced
v. Purchase Turnover Collected
So, each and every category is going to show only those transaction amounts that are related to that particular nature. And thus, reporting completes the Accounting Module. Here, we will know how to check the reporting which is fully customized and allows you to add the accounting accounts with your own adequate knowledge of accounting. Therefore, we will first discuss “Predefined Groups” under “Income/Expense” of Reporting Section.
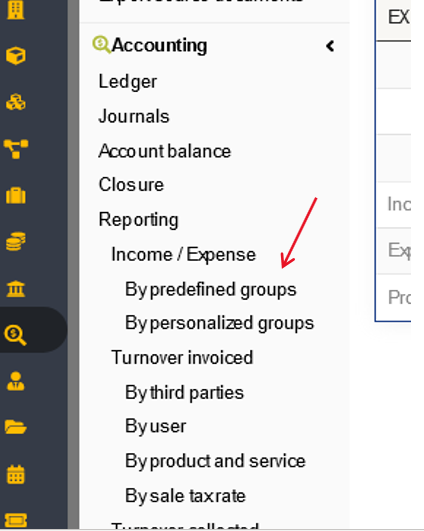
But how do we get predefined groups of accounting accounts?
For that, you have to go to Setup -> Chart of Accounts. There will be a wholesome list of accounting accounts. As you see further, you will find “Group of Account” written in the blue band.
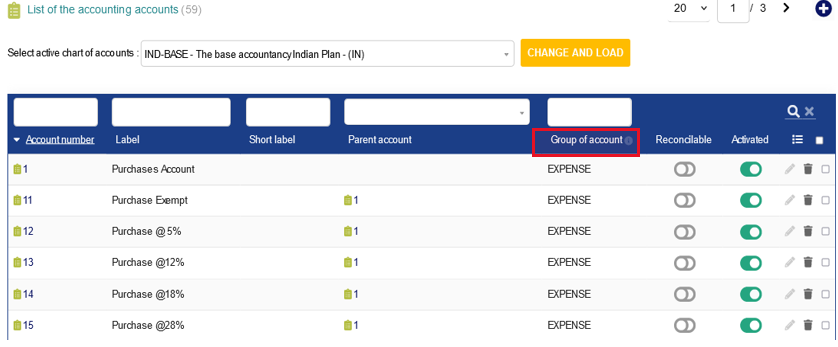
You have to categorize the accounting accounts as per their expense/income nature. For Example:- Purchases for any company lead to Expenses because you pay the vendor against the products or services purchased. Therefore, you can group Purchases under Expense whereas Sales under Income.
And for that, you will see a sign on the extreme right side of each accounting account when hovered implies “Modify”. Click on that. Then appears the page from you add a new accounting account to the list or in other cases you modify them.
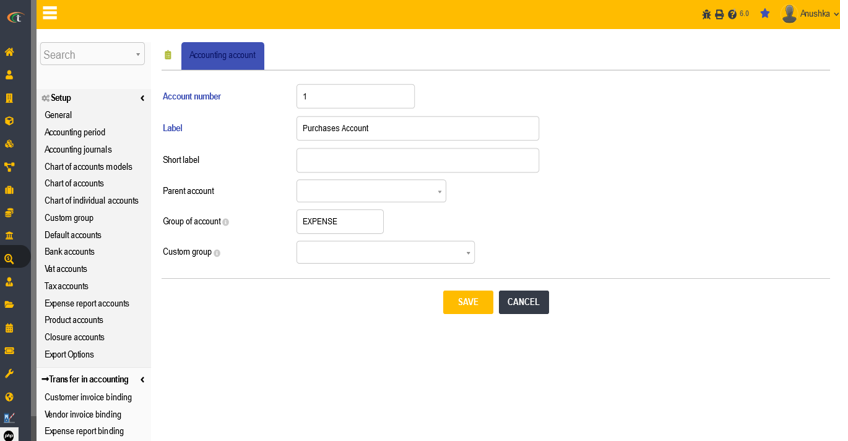
This is the page that you see. There is a field name that recites “Group of Account”. When you hover over it, it states that “Group of Account are used as predefined ‘filter’ and ‘grouping’ criteria for some accounting reports. For Example, ‘INCOME’ or ‘EXPENSE’ are used as groups for accounting accounts of products to build the expense/income report.” Thus, from here the person in charge of accounting and reporting of the company, shall group them under either “Income/Expense”. Then when you will wish to see the reporting under predefined groups, setting the reporting period, transactions recorded under that accounting account will appear.
Reporting of Income/Expense By Personalized Groups can be created when you click on “Custom Group” just below the Group of Account.
NOTE: You will find “Custom Group” under Setup. Under Custom Group, you are free to define here some groups of accounting accounts which later on will be used for personalized accounting reports.